How to Build a ChatGPT-Powered Chatbot for Your WordPress Website

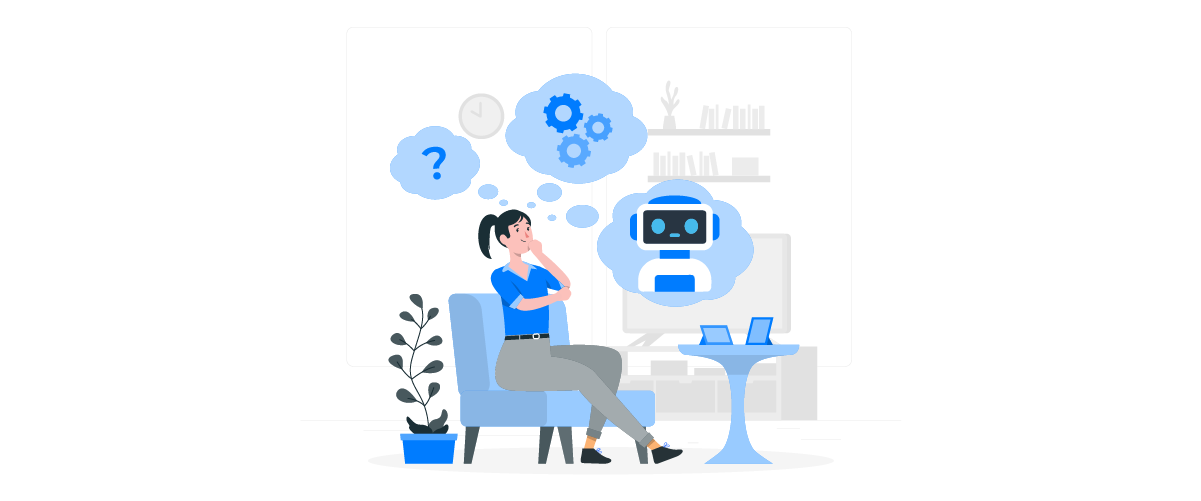
AI chatbots are changing how websites interact with users, offering instant support, answering frequently asked questions, and generating leads. One of the most powerful tools available today is OpenAI's ChatGPT; integrating it into your WordPress site is easier than you might think.
In this guide, we'll walk you through setting up a ChatGPT-powered chatbot on your WordPress site, customizing its behavior and style, and exploring useful support and lead generation applications. Let's start!
- Integrating a ChatGPT-powered chatbot into WordPress provides instant, interactive support and answers for visitors, boosting user engagement, satisfaction, and time on site.
- This solution streamlines content creation and automates routine tasks, allowing you to generate articles, product descriptions, headlines, and responses directly from your WordPress dashboard—saving time and reducing manual workload.
- By leveraging AI's advanced natural language processing, you can offer personalized experiences, improve SEO, and enhance your website's overall functionality—making your site smarter, more helpful, and poised to convert more leads.
Table of content
- What You Need Before Building ChatGPT Chatbot?
- Integrating ChatGPT & Creating New Chatbot
- Customizing Your Chatbot's Behavior and Style
- Training Your Chatbot with Data
- Customizing Your Chatbot's Design
- Use Cases for ChatGPT Chatbots on a Website
- Best Practices for Building an Effective ChatGPT Chatbot
- Conclusion
What You Need Before Building ChatGPT Chatbot?
Before integrating ChatGPT into your WordPress site, it's important to ensure that all the basic requirements are in place. This step will help the process run smoothly without technical issues. Here's what you need to prepare:
- An active WordPress website – You must have an active and accessible WordPress site. This will be the platform where your chatbot is integrated and operates.
- A registered OpenAI account and ChatGPT API key – To use ChatGPT, you must sign up at OpenAI and generate an API key. This key will connect your chatbot to OpenAI's ChatGPT model.
- A third-party chatbot plugin – These plugins allow you to create a chatbot quickly without much configuration. You simply insert the API key obtained from ChatGPT. One chatbot plugin that supports chatbot functionality is WP AI Assistant.
- (Optional) Basic HTML/CSS knowledge – If you want to customize the appearance of your chatbot, such as its color, position, or icon, a little knowledge of HTML and CSS will be very helpful. However, it's not required to run a basic chatbot.
With all these essentials ready, you'll be better prepared to move on to your ChatGPT-based chatbot's integration and customization phase on your WordPress site.
Turn Your Website Into a Smart AI Powered Assistant!
Engage visitors 24/7 with an intelligent chatbot that understands your business, deliver instant answers, and boosts conversions—no technical skills required!
Integrating ChatGPT & Creating New Chatbot
Here, you need to add OpenAI ChatGPT to WordPress. Here are the steps to integrate it.
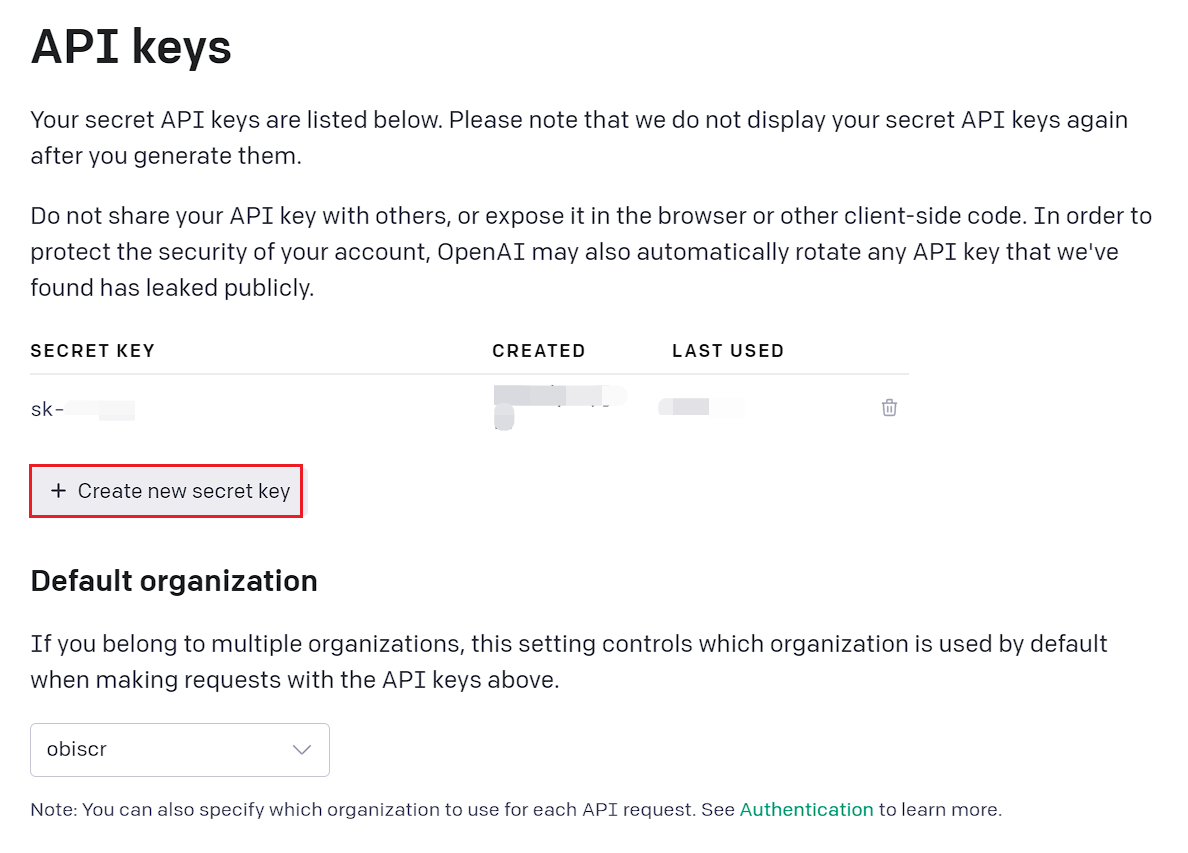
Step 1: Get Your API Key from OpenAI
To get started, first create an account with OpenAI. After that, go to the official website and login. Once logged in, go to the account menu and select "View API key."
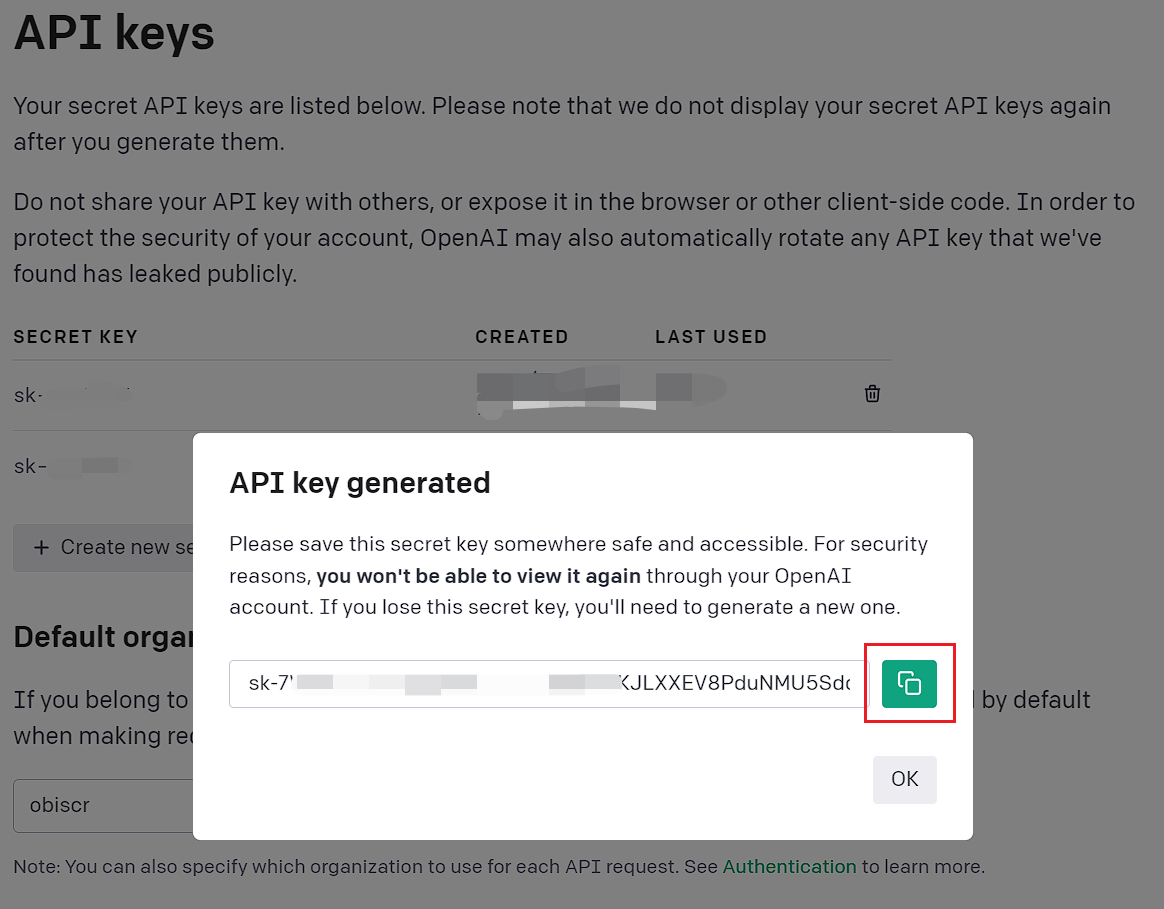
Next, click the "Create new secret key" button in the image below.
The system will automatically generate the key. Finally, click the copy button on the right to save it.
Step 2: Install and configure the AI plugin
Once you get your API key, the next step is to use a third-party plugin to integrate it with WordPress. One plugin that can be used is WP AI Assistant. Some of its excellent features are:
- Direct integration with OpenAI
- Ability to train AI using data from WordPress or other data.
- Automatic data updates
- Compatible with various GPT models
This plugin allows you to create a chatbot that automatically responds to questions from your site visitors or customers. Here are the steps to connect OpenAI with WP AI Assistant
To start using this plugin, install it first through the WordPress dashboard. Go to Plugins > Add New Plugin > Upload Plugin, then upload the plugin's ZIP file.

To activate it, click the Activate button. After the activation process is complete, the WP AI Assistant menu will appear on the left sidebar of your WordPress dashboard.
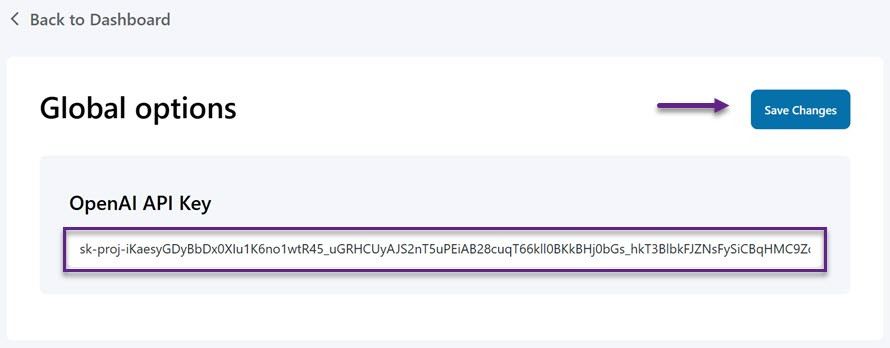
Step 3: Embed the API key
Step three, it's time to embed the API key. Open the menu, and a new interface will appear. Navigate to the Settings tab and enter the API key you received from OpenAI.
Then, enter your API key in the provided field and click Save Changes to confirm and apply your settings.
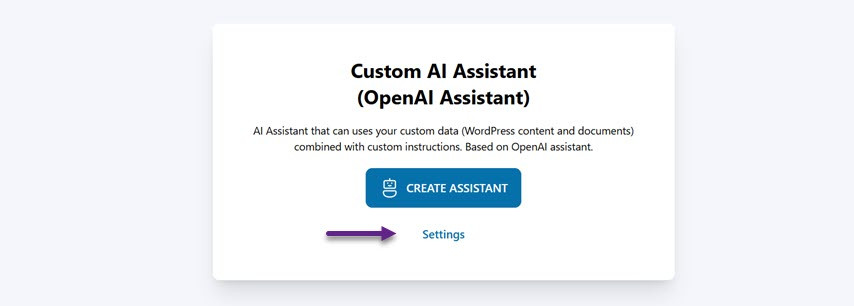
If the connection between OpenAI and the plugin is successful, the next step is to create a virtual assistant to manage user inquiries. Go to the WP AI Assistant menu and select Create Assistant.
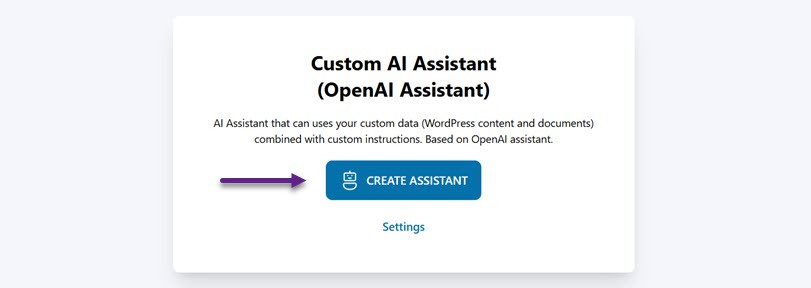
Provide a name for your assistant and click Save Changes. Don't worry—you can update the name later at any time.

Customizing Your Chatbot's Behavior and Style
After successfully creating a chatbot, WP AI Assistant also supports style customization for your chatbot to suit your business better.
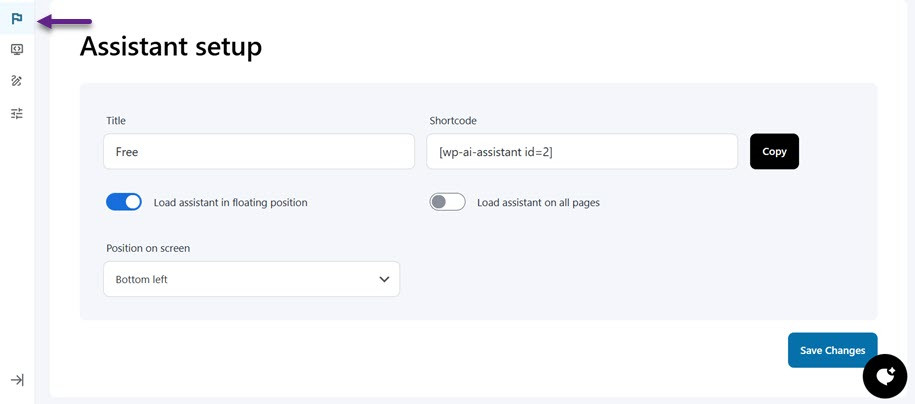
Step 1: Set up your assistant
Click the icon with the flag to access the assistant settings. From here, you can customize the assistant's name, choose its position on the screen (bottom left or right), decide if it should appear as a floating widget, and whether it should be displayed across all pages. You'll also find shortcode options to embed the chatbot wherever you want.
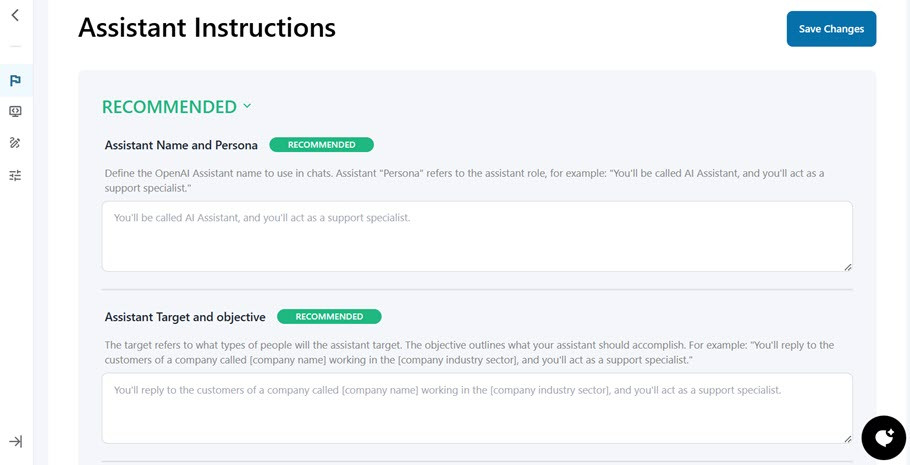
Step 2: Define instructions for your Chatbot
Scroll down to the instruction settings to personalize how your assistant responds. You'll enter prompts here to guide the assistant's behavior:
- Assistant name and persona: Choose a name and define the assistant's role or personality, such as a support agent or sales representative.
- Target and objective: Specify who the assistant will be helping and what tasks the assistant should accomplish.
- Custom data access: Set rules for how the assistant uses your documents or saved data.
You can further fine-tune your assistant with optional configurations:
- First message: Set the initial message that appears when a user starts a new conversation.
- Content types: Define the content the assistant should generate—like code snippets, product descriptions, or FAQs—and where it should appear.
- Response length and tone: Control how long and formal the assistant's replies should be. Example: "Keep responses clear and formal, with a maximum of 500 words per message."
- Example responses: Provide example answers to guide the assistant. For instance: "If a user asks about [specific product], always include [specific detail] in your response."
Training Your Chatbot with Data

The next step is to perform training on the chatbot using data. This plugin also supports data training for your assistant. You can train it using content from your WordPress site, uploaded documents (such as PDFs or text files), or external URLs. This ensures the assistant provides highly relevant and up-to-date information to the user.
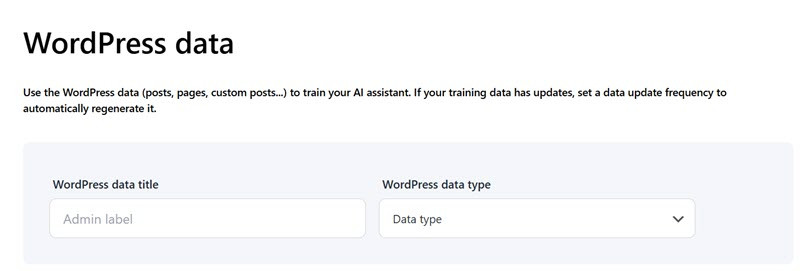
Step 1: Train the Chatbot using WordPress
To start, you'll train the assistant using your WordPress site's existing content. This can include posts, pages, products, or other custom content types. If the content changes regularly, you can define how often the system should refresh the training data to keep it current.
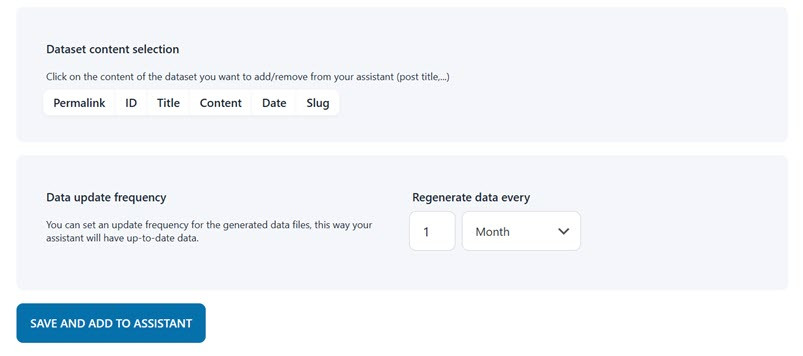
Begin by specifying the title and type of WordPress content you want the assistant to learn from, such as Posts, Pages, or Products. You can also choose which elements to include or exclude, such as the permalink, ID, title, content, date, or slug.
Lastly, set how frequently the data should be updated—whether every few months, days, hours, or minutes—depending on how often your content changes. Once configured, click Save and Add to Assistant to complete the training process using your WordPress data.
Step 2: Train the Chatbot using Documents
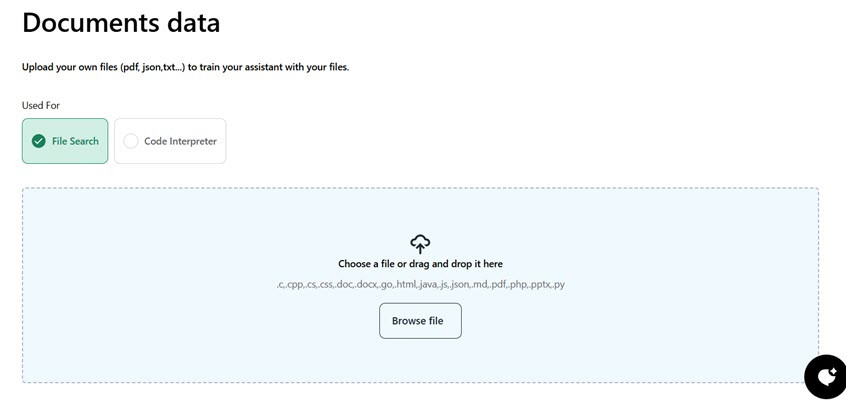
Another way to train your assistant is by uploading documents directly to WordPress. You can decide whether the document will be a searchable file or a code interpreter. The file must be in a specific format if it's used for a search. A wider range of formats is supported for code interpretation, such as .jpg, .jpeg, .xlsx, .xml, and more.
Click the "Browse file" button to select the document. Once the file is successfully uploaded, it will appear at the bottom of the screen.
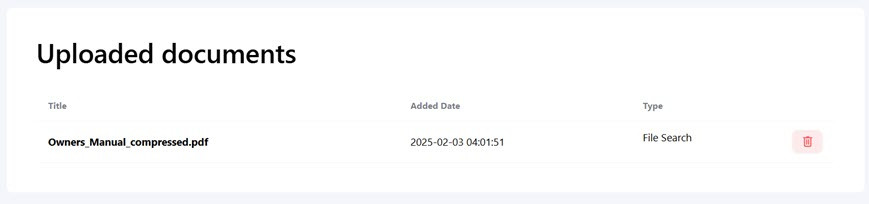
For example, here we've uploaded a PDF document, and its content can now be used to enhance the knowledge base. If the upload is successful, the document will be listed here.
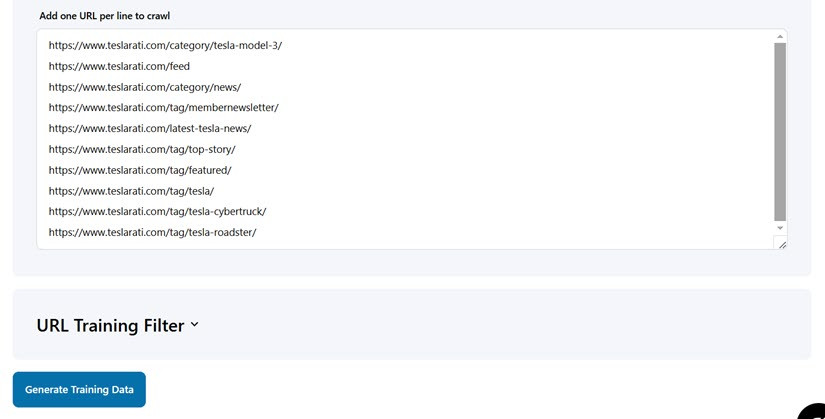
Step 3: Train the Chatbot using external URLs
Additionally, you can train your assistant using data from external URLs. Using URLs from any domain, you can extract the content of a page and convert it into structured data (JSON) to enhance your assistant's knowledge base. For instance, this could be a product documentation page.
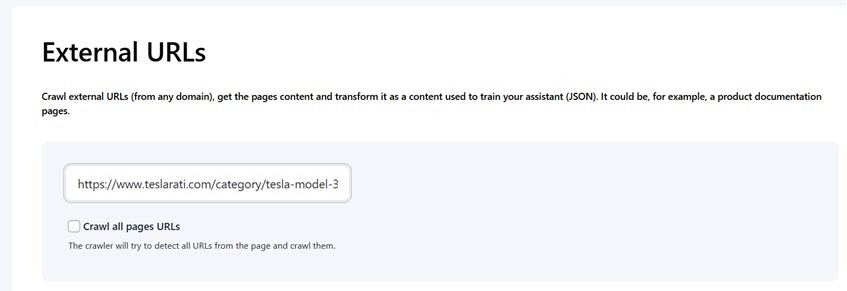
Enter the URL in the provided field and check the "Crawl all page URLs" option. You can also limit the maximum number of URLs to crawl.
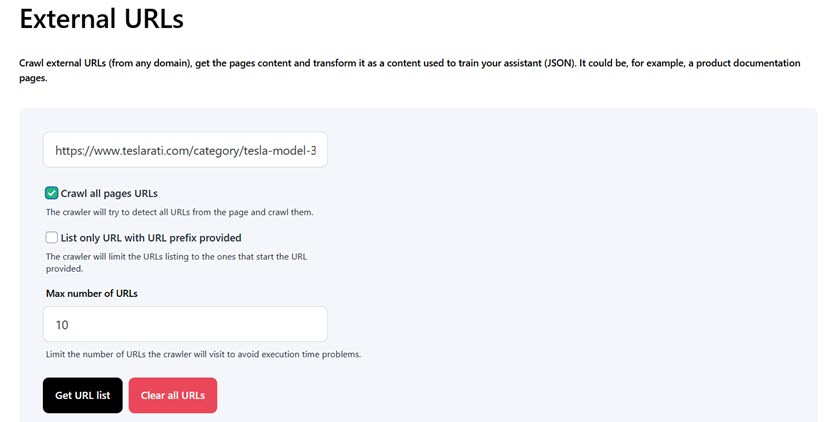
Next, click "Get URL list" and a list of URLs from the specified page will be generated. You can refine the data by adding special HTML or CSS tags to exclude irrelevant content. Once you're satisfied, click "Generate Training Data."
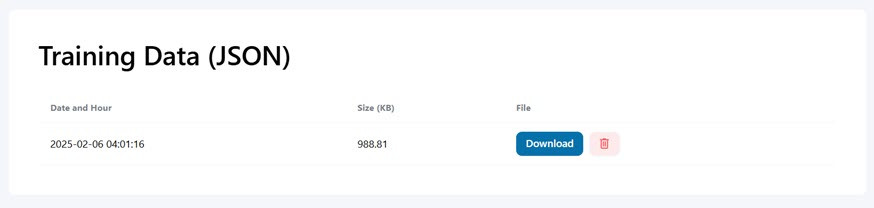
If the data is successfully processed, it will be converted into a JSON format and displayed in the list, along with the creation date and file size. You can choose to download or delete the data as needed.
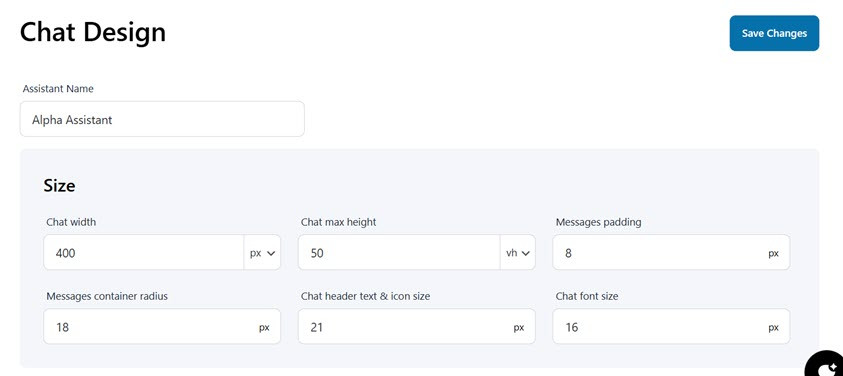
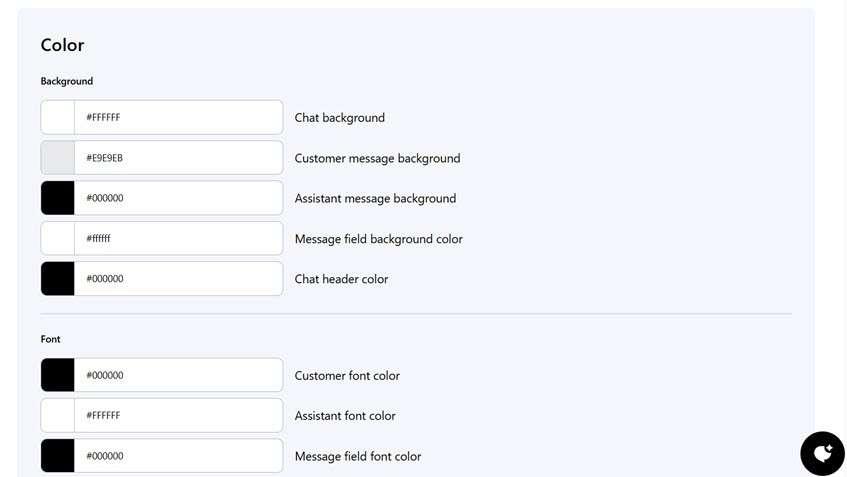
Customizing Your Chatbot's Design
Finally, after training the data, you can customize the chatbot in terms of design. WP AI Assistant supports customization ranging from chat design size, color for background, fonts, buttons, to messages.
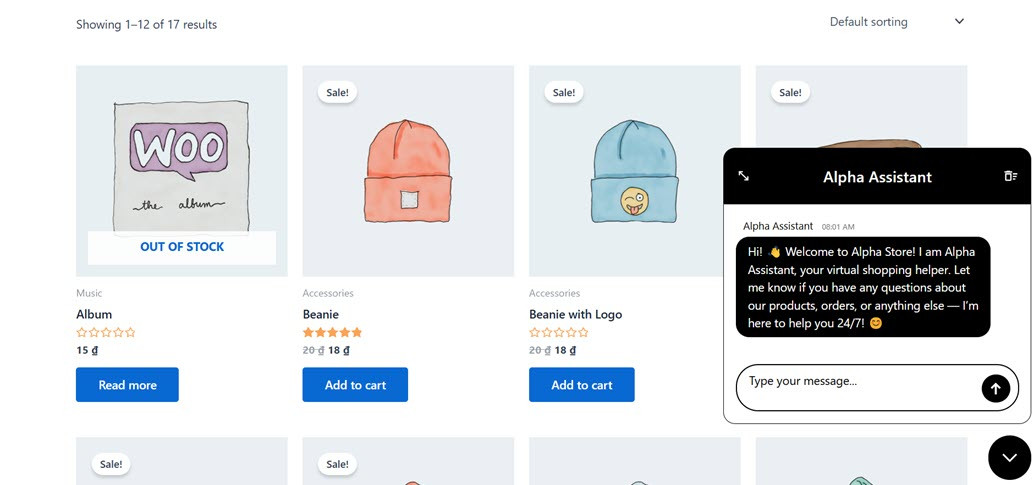
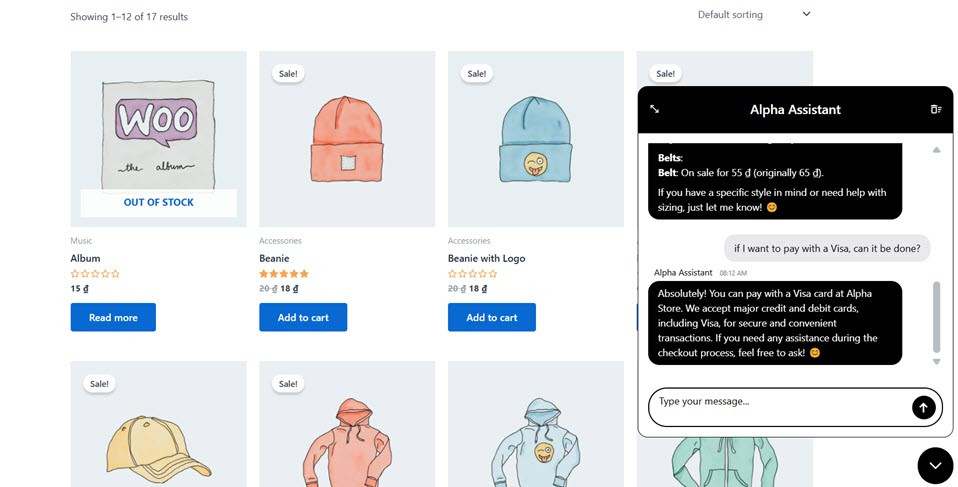
After setting everything from integration with ChatGPT, training, to customized design, you can publish the chatbot by selecting the Publish button. This is what the chatbot that we have created looks like.
Use Cases for ChatGPT Chatbots on a Website
ChatGPT-powered chatbots on WordPress are transforming how businesses interact with website visitors. With natural language processing and real-time responsiveness, these chatbots offer a personalized and efficient experience beyond traditional web interfaces.
Here are three powerful ways to use a chatbot on your WordPress site to streamline support, enhance user experience, and drive conversions.
Customer Support
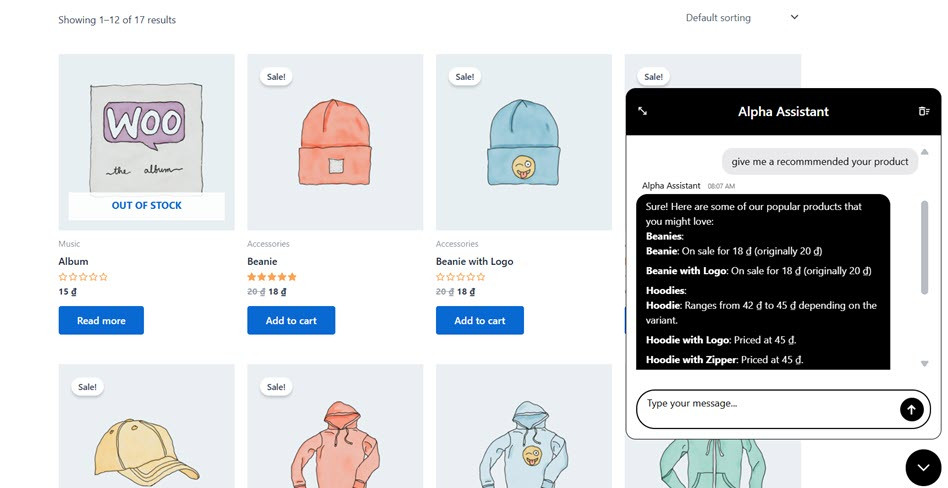
A chatbot can act as a first-line support agent that never sleeps. It can instantly answer repetitive inquiries—like "What is your recommended product?" or "What are your shipping rates?"—freeing human agents to focus on more complex issues. This reduces response times and improves customer satisfaction around the clock.
In addition, chatbots can also be used to recommend documentation links or tutorial videos. When visitors need help, a chatbot can guide them to the right help article or tutorial video, acting as a smart navigator through your knowledge base. This not only saves users time searching manually, but also increases the visibility of your support content.
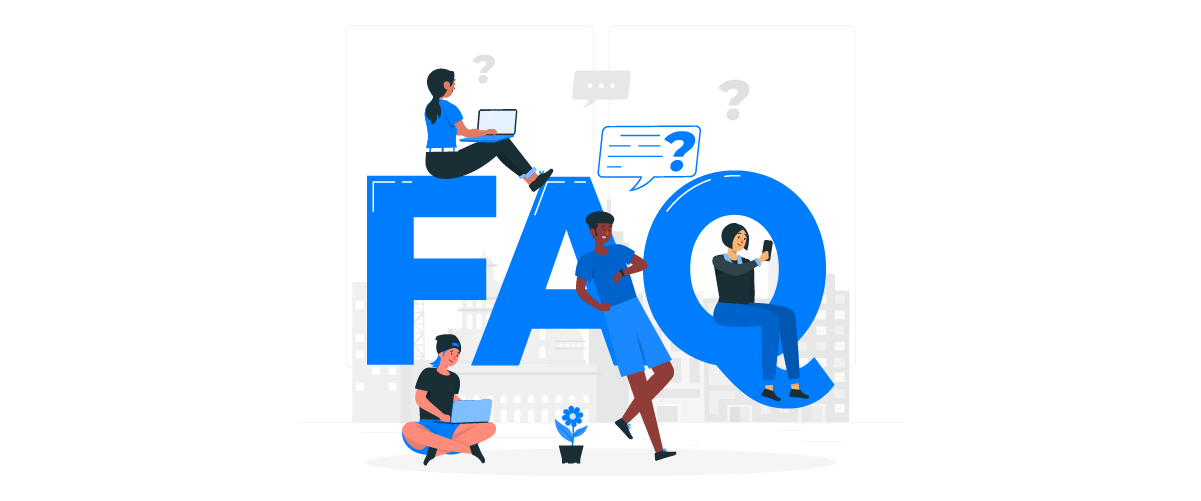
FAQ Assistant
The next case is being used as an FAQ assistant. Static FAQ pages can be overwhelming, especially if they are long or poorly organized. A chatbot creates a more communicative and user-friendly way to provide FAQ answers by responding to specific user questions individually.
In addition, chatbots can also help users search for answers quickly. Instead of browsing through various categories or scanning dense text, users can type in their questions naturally. The chatbot can then provide immediate and contextualized answers, thus significantly reducing the time spent searching for information.
Lead Generation
Chatbots can be programmed to collect essential lead information, such as name, email, and user preferences, before a conversation begins. This proactive approach helps you segment your audience based on their interests and allows the chatbot to deliver more personalized and relevant interactions right from the start.
Once this information is gathered, it can be seamlessly integrated with popular marketing and CRM tools like Fluent Forms, HubSpot, or Mailchimp. This integration streamlines your lead management process by ensuring that all data is instantly captured and organized for follow-up.
From there, the chatbot can automatically push the collected data into your CRM or autoresponder system, eliminating the need for manual entry. As a result, your team can deliver timely, targeted messages that strengthen engagement and move prospects efficiently through the sales funnel.
Best Practices for Building an Effective ChatGPT Chatbot
After creating your chatbot, it's also important to apply best practices to ensure it remains effective and provides users with a relevant and valuable experience.
Define a Clear Purpose
Before building your chatbot, determine its main goal. Will it focus on customer service, answering frequently asked questions, or generating leads? This objective will influence how you structure conversations, choose integrations, and design the interaction flow.
With a clear purpose, you can align the chatbot's persona, tone, and functionality to meet specific needs. This helps keep the chatbot focused and prevents confusing users with irrelevant information.
Keep Updating Your Prompt Logic Based on User Interactions
An effective chatbot isn't a one-time build—it should evolve continuously based on user interactions. Regularly analyze conversation logs to identify patterns, confusion, or unanswered requests. From there, you can adjust or expand the prompt logic to make the chatbot more relevant.
With regular updates, the chatbot becomes smarter and more responsive, enhancing user satisfaction as it better understands their needs over time.
Always Limit Input Length to Avoid Misuse
Limiting input length is crucial for maintaining your chatbot's performance and security. Overly long inputs can strain the system or be exploited to generate undesirable responses. Use character or token limits on each incoming message.
By enforcing these limits, your chatbot stays stable and responsive, and you reduce the risk of abuse. It also helps keep conversations concise and on topic.
Sanitize User Messages to Prevent Malicious Input
Before processing user input, it's essential to sanitize or clean messages of harmful elements. For example, strip out HTML scripts, malicious code, or suspicious links that could be used to attack your system or exploit data.
Sanitizing messages not only safeguards the system but also protects users from potential risks. This is a crucial layer of defense, especially when your chatbot is deployed in open or public environments, such as a WordPress site with many visitors.
Smarter Conversations, Happier Visitors!
Provide instant answers, assist users 24/7, and automate support effortlessly. WP AI Assistant is your key to a more interactive and intelligent website.
Conclusion
Adding a ChatGPT-powered chatbot to your WordPress site can improve support, increase engagement, and drive leads automatically. With just a few tools and a little customization, you'll have a smart assistant active on your site in no time.
Moreover, with the help of the plugin, the integration process becomes much easier, from entering the API key, setting the chatbot behavior, to training it with data from external sites, documents, or URLs. Ready to try it? Start by grabbing your OpenAI key, integrating it with WP AI Assistant, and experimenting with your first chatbot build today!
When you subscribe to the blog, we will send you an e-mail when there are new updates on the site so you wouldn't miss them.

Comments