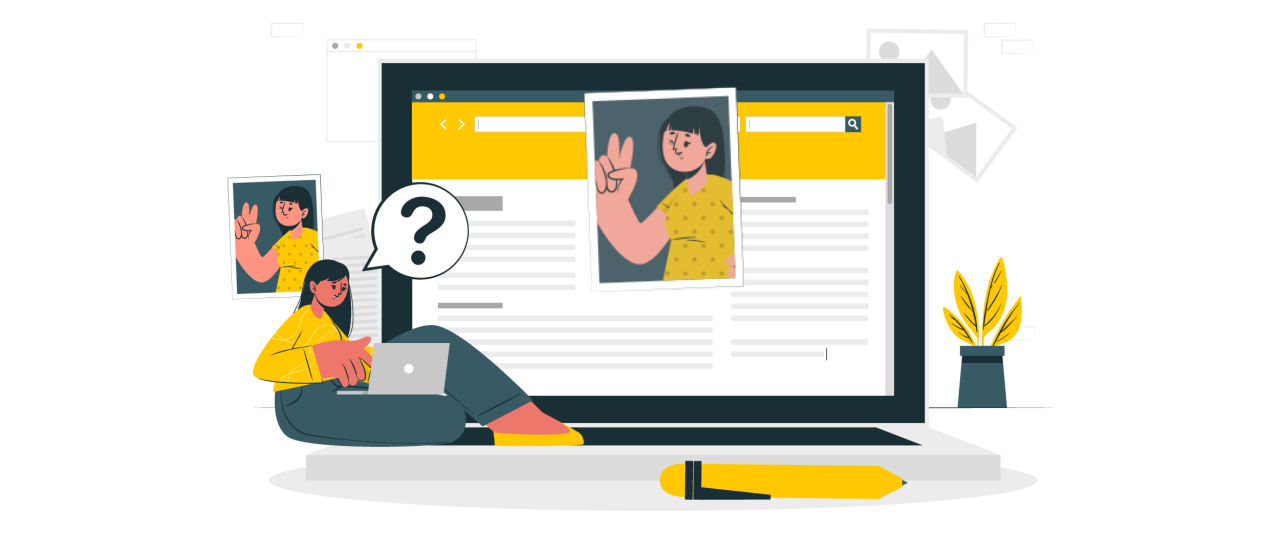
How to Fix Image Color and Saturation Loss in WordPress

Fixing image color and saturation loss in WordPress is a common challenge when images that appear sharp on your computer become faded or discolored after being uploaded to your website. This problem can ruin the overall look of your pages, especially if you rely on high-quality visuals for branding, portfolios, or products.
Fortunately, this color change does not mean your image files are damaged. Usually, the cause lies in color profile settings, WordPress's automatic compression, or the effects of themes and plugins. In this guide, you will learn the causes of image color changes after uploading and various practical ways to keep the original colors consistent in WordPress.
- Always convert your images to the sRGB color profile before uploading to WordPress to ensure colors display accurately and vibrantly across all browsers and devices.
- Disable or control WordPress's default JPEG compression using plugins or custom code to prevent unwanted dulling and fading of image colors after upload.
- Check your WordPress theme, page builders, and any CDN or image optimization plugins for automatic overlays or recompression features that may alter your image colors without your knowledge.
Table of content
- Why Do Images Look Desaturated or Washed Out After Uploading to WordPress?
- How to Fix Image Color and Saturation Loss in WordPress using Adobe Photoshop
- How to Fix Image Color and Saturation Loss in WordPress using GIMP
- Additional Tips to Prevent Color Changes in WordPress
- FAQ About Image Color Accuracy in WordPress
- Conclusion
Why Do Images Look Desaturated or Washed Out After Uploading to WordPress?
Before you start fixing it, it's important to understand the cause first. Images changing color or looking paler after being uploaded to WordPress don't happen randomly, several technical factors influence it. Here are some of the main reasons:
- Color profile differences (sRGB vs Adobe RGB): Many editing software programs, such as Photoshop, use the Adobe RGB color profile, which has a wider color spectrum. However, most browsers only support sRGB. If images are not converted to sRGB before uploading, the colors appear duller when displayed on the web.
- WordPress automatic compression: WordPress applies default compression to JPEGs to speed up loading. Unfortunately, this compression can reduce saturation and contrast, especially in images with many color gradations.
- The influence of CSS or styling from themes/page builders: Some themes or page builders add overlays, filters, or brightness effects that indirectly change the original color appearance of images.
- CDN or image optimization plugins: If you use a CDN or plugins such as Smush, Imagify, or Jetpack, images may be recompressed without your knowledge, causing the colors to change.
- Screen Calibration Differences (Desktop vs. Mobile): Colors can appear different depending on the device. Smartphone screens often have higher saturation than regular laptop monitors, so that the difference can be significant.
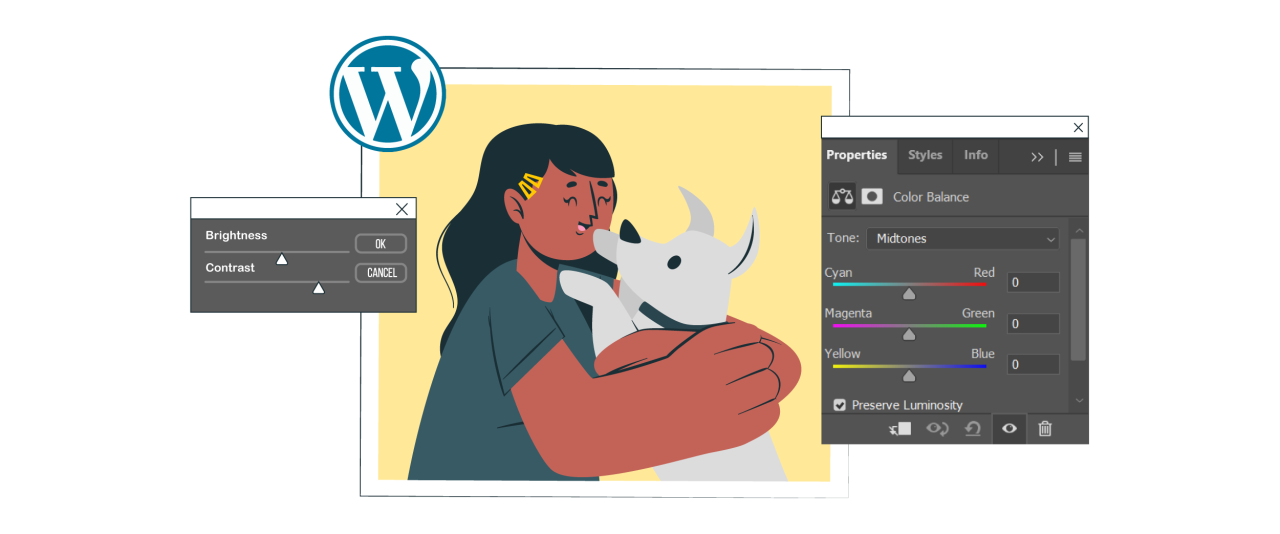
How to Fix Image Color and Saturation Loss in WordPress using Adobe Photoshop

A reliable way to prevent washed-out colors in WordPress is by converting your images to the sRGB color space before uploading them. This can be done quickly using Adobe Photoshop or any other professional editing tool that supports color profile adjustments.
This is the workflow many professional design teams use to ensure that graphics and screenshots always look vibrant and consistent across all browsers and devices.
Method 1: Convert Images to sRGB
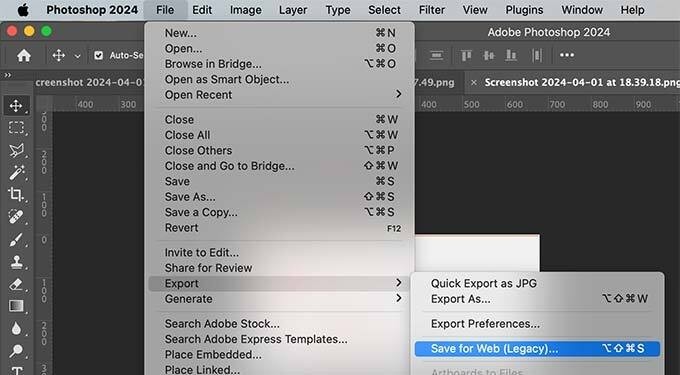
The most practical way is to convert the image to sRGB during export. After opening the image in Photoshop, use the Save for Web (Legacy) option from the File menu.
Activate the "Convert to sRGB" option in the export window before saving. This way, Photoshop will ensure that the image colors are adjusted to web standards. You can also embed a color profile in the file, but most browsers ignore this metadata, so converting to sRGB remains the most important step.

Method 2: Edit Color Settings in Photoshop
If you want a more permanent approach, you can set Photoshop to work with the sRGB color space automatically. Open the Color Settings menu via the Edit option, then select the "North America Web/Internet" preset. After that, in the Color Management Policies section, set all RGB images to be automatically converted to Working RGB.
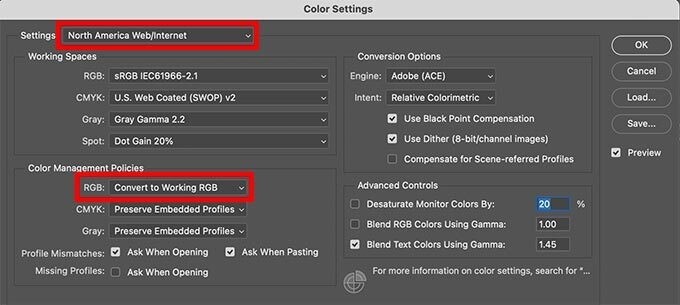
With this setting, Photoshop will display a warning every time you open an image with a different color profile. To ensure the saturation and tone remain accurate, simply choose the option to convert the document's colors to the working space.

Once the changes have been applied and the image has been resaved, the file can be uploaded to WordPress without the risk of the colors becoming dull or different from the original.
How to Fix Image Color and Saturation Loss in WordPress using GIMP
GIMP is a powerful and completely free alternative to Adobe Photoshop, and it can also be used to correct color profile issues before uploading images to WordPress. When you open an image in GIMP, the software typically detects whether the file already contains an embedded color profile.
If the photo is using Adobe RGB, GIMP will usually display a prompt asking whether you want to convert it. However, not all images include a profile, and in some cases, GIMP may fail to recognize it, which means you'll need to perform the conversion manually.
Knowing which color space your image was originally saved in is helpful before converting. Many cameras capture photos in Adobe RGB by default, which may vary depending on your settings. If unsure, check your camera's configuration or refer to its documentation. Since GIMP does not come with the Adobe RGB profile pre-installed, you'll need to download the Adobe RGB ICC Profile separately.
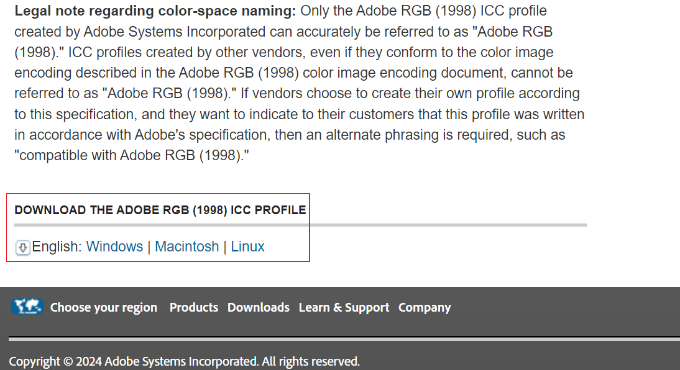
This file can be obtained from Adobe's website under their digital imaging resources section. After selecting your operating system and extracting the downloaded ZIP file, you'll find the AdobeRGB1998.icc profile inside.
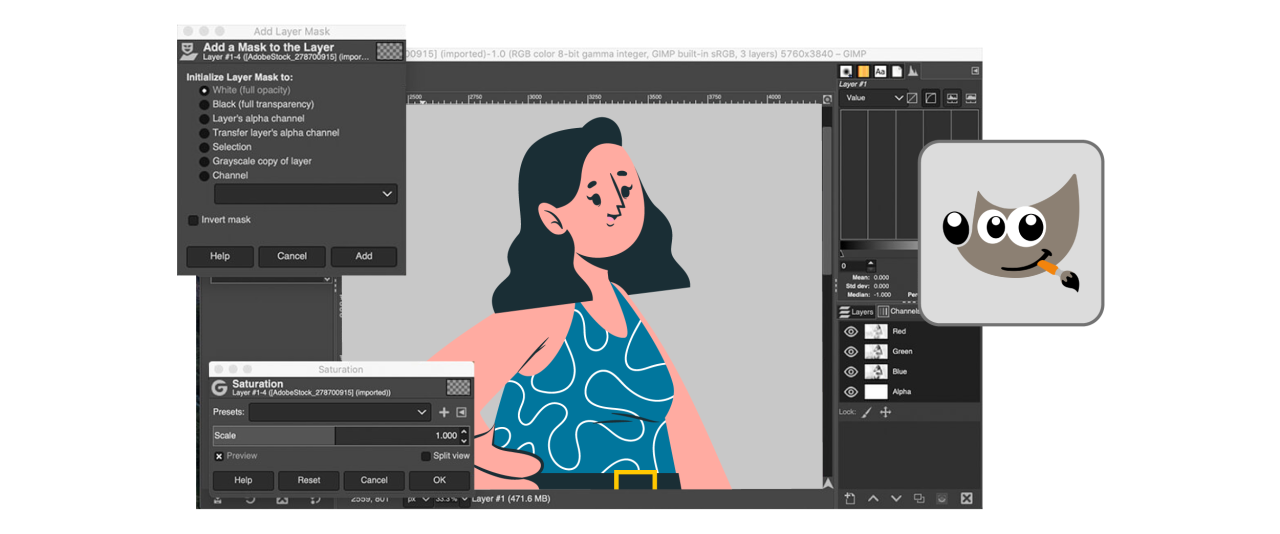
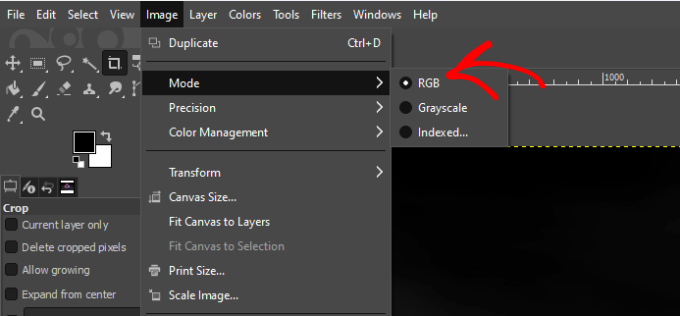
Once the ICC profile is saved to your computer, open the image in GIMP and make sure it's set to RGB mode via the Image > Mode menu.
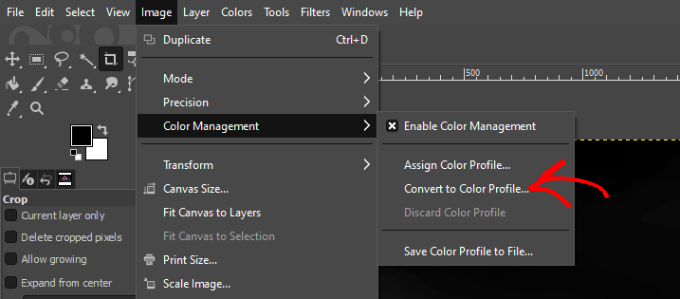
With that confirmed, you can assign or convert the color profile. Navigate to Image > Color Management > Convert to Color Profile.
And when the dialog appears, choose Built-in RGB as the target profile.
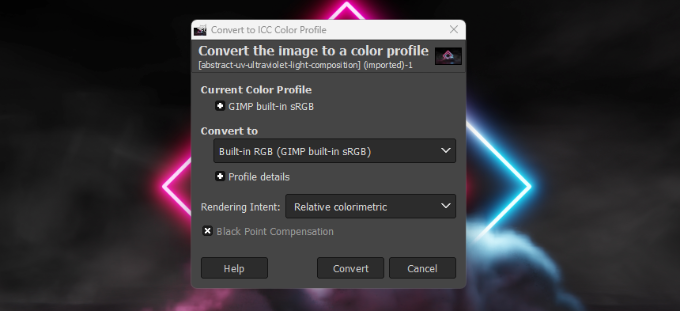
This ensures the image is converted to sRGB, the standard color space all browsers support. After saving the image, it will retain accurate saturation and contrast when uploaded to WordPress. You can repeat this process for any other images that require adjustment.
Additional Tips to Prevent Color Changes in WordPress
In addition to correcting the color profile before uploading, you can make several adjustments directly within WordPress to help maintain accurate image colors after publishing.
Disabling Image Compression via Code or Plugins
WordPress compresses JPEG images by default to reduce file size and improve loading speed. Unfortunately, this compression can dull or fade colors, especially in photos with subtle gradients. You can disable this compression by adding a small code snippet to your functions.php file or using an image compression plugin that lets you manually control the compression level. If you don't want to deal with code, plugins like Disable JPEG Compression or WP Resized Image Quality provide a safer, user-friendly alternative.
However, you can control image quality through a centralized media solution if you prefer an even more streamlined approach without managing multiple tools. WP Media Folder offers built-in options to manage file replacement, set custom compression levels, and even sync images with cloud storage. This allows you to fine-tune image quality without editing WordPress functions or juggling separate plugins, ensuring your visuals remain consistently sharp across your entire site.
Say goodbye to messy media library.
WP Media Folder lets you categorize files, sync folders with
cloud storage, create amazing galleries and even
replace images without breaking links.
Optimize your media workflow today
Checking Theme or Page Builder Effects on Image Styling
Some WordPress themes and page builders, such as Elementor, Divi, or WPBakery, automatically apply visual effects such as overlays, CSS filters, or adjustments to brightness and contrast. These effects may not be immediately noticeable during editing, but can subtly alter image colors once the page is published.
To confirm whether this is happening, try displaying the same image on a blank page without any styling or layout elements. If the colors look correct, your theme or builder applies additional visual effects in the background. You can fix this by disabling overlays, removing unwanted CSS filters, or assigning a custom class that displays the image without modification.
Using CDN or Lazy Load Without Affecting Image Quality
Content Delivery Networks (CDNs) such as Cloudflare, BunnyCDN, or Jetpack Image CDN often include automatic optimization features that recompress images or convert them to formats like WebP. If the compression is too aggressive, it may reduce saturation or alter the overall tone of the image.
To avoid this, check your CDN settings and disable automatic optimization or set the quality higher. If you're using a lazy load plugin, verify whether it adds placeholder effects or filters before the image fully loads. Choose a lazy loading solution that delays image loading without changing its visual appearance for the best results. This way, you can maintain both performance and color accuracy.
FAQ About Image Color Accuracy in WordPress
Even after applying the best settings, some image inconsistencies may still appear depending on the device, format, or how the file was uploaded. Here are answers to the most common questions about color shifts in WordPress.
Why Do My Images Look Different on Mobile vs Desktop?
The difference in color between mobile and desktop devices is usually caused by display variations rather than an issue with the actual image file. Mobile screens, especially on modern smartphones, boost contrast and saturation automatically to make visuals appear more vibrant. On the other hand, Desktop monitors may not be color-calibrated, leading to duller or cooler tones.
It's best to test your images on multiple devices before publishing to minimize inconsistencies. You can also use display calibration tools or browser-based color proofing extensions. While making images look identical on every screen is impossible, optimizing them in sRGB format ensures the most consistent rendering across platforms.
Do WebP Images Lose More Color Than JPEG or PNG?
WebP is known for offering better compression with smaller file sizes, but depending on how the image is converted, it may produce slight shifts in contrast or saturation. Lossy WebP compression can sometimes make subtle color variations less pronounced, especially in gradients or skin tones. However, when exported with high-quality settings or in lossless mode, WebP can retain color fidelity just as effectively as JPEG or PNG.
If you're using a plugin or CDN that automatically converts images to WebP, ensure it allows you to control the quality level. Some tools default to aggressive compression, which prioritizes performance over accuracy. Choosing a higher quality preset or manually exporting WebP files gives you more control over the final result.
Can I Restore Original Colors After Uploading?
Once an image has been compressed or its color space altered during upload, it cannot always be fully restored to the original appearance within WordPress. However, you can replace the affected image with a corrected version by re-exporting it in sRGB and disabling any compression or filters applied during upload. This ensures that the updated file displays as intended.
If you're unsure whether the current image has been modified, try downloading it directly from WordPress and comparing it with the original file on your computer. If you notice a visible difference in tone or saturation, it's best to re-upload a properly converted version. Keeping an organized archive of your original images will make this process much easier when revisions are needed.
Calling all webmasters!
Save time and boost productivity with WP Media Folder. Effortlessly organize client media
files, create custom
galleries, and provide a seamless user experience.
Upgrade your website projects now!
Conclusion
Fix image color and saturation loss in WordPress ultimately comes down to controlling how your images are processed before and after upload. By converting files to the correct color profile, disabling unnecessary compression, and monitoring how themes or plugins affect visual output, you can ensure that your photos retain their intended clarity and vibrancy across all devices. Consistency isn't just a technical detail, it's crucial to maintaining brand quality and visual trust.
A dedicated media management plugin can make all the difference if you want full control over how your media files are stored, organized, and displayed without risking unwanted color changes. Try WP Media Folder to get advanced file organization, cloud sync, and compression control directly inside WordPress.
When you subscribe to the blog, we will send you an e-mail when there are new updates on the site so you wouldn't miss them.


Comments