WordPress Google Cloud Storage - How to Offload Your Media

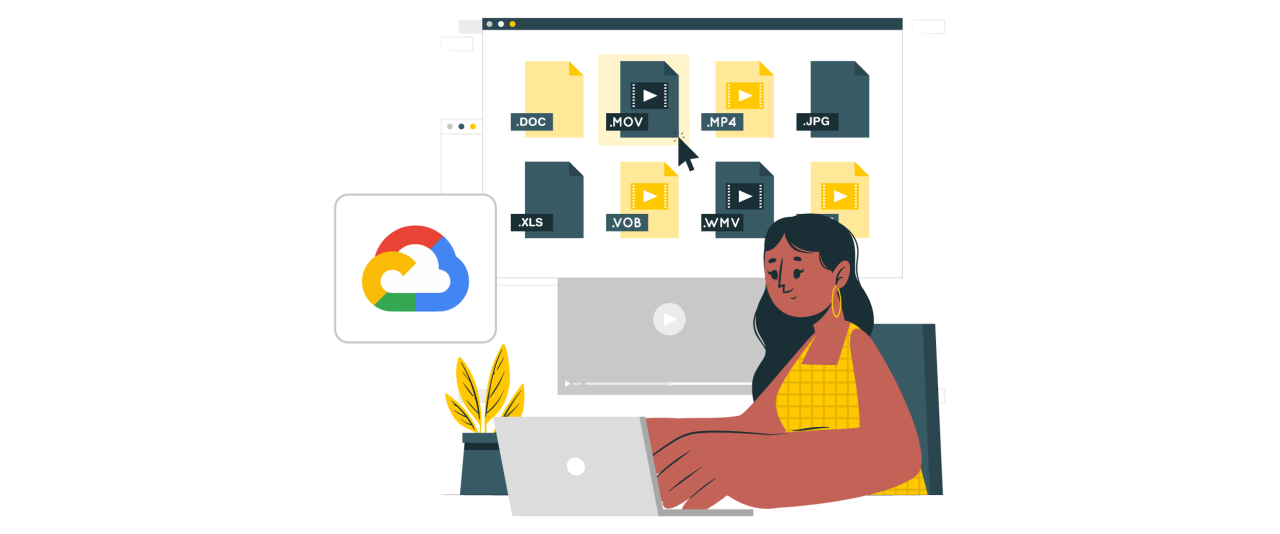
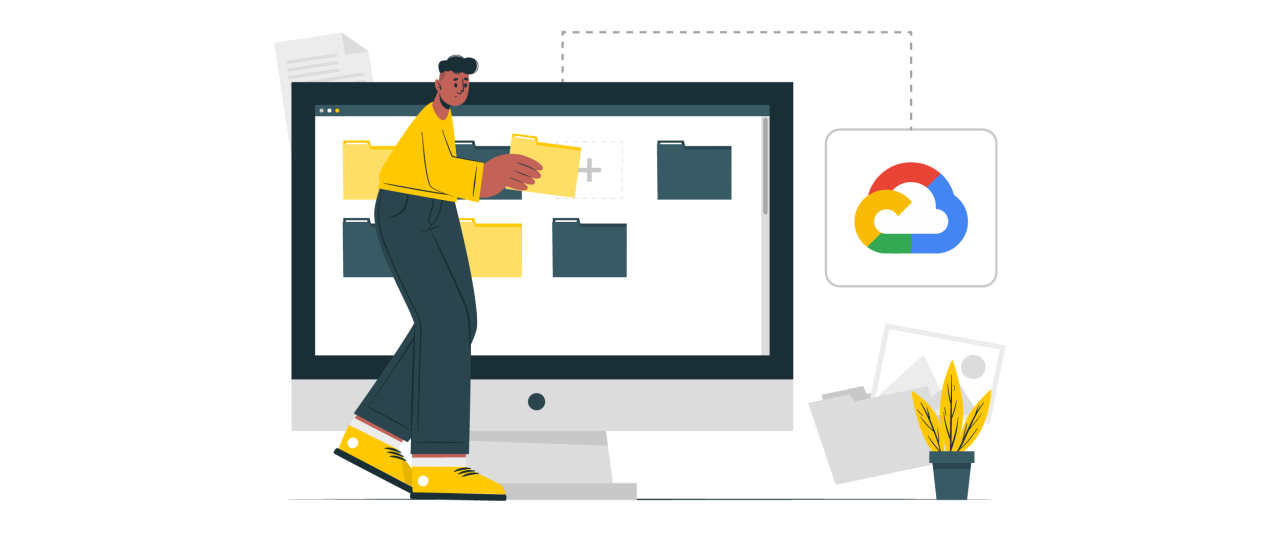
Managing large amounts of media files can slow down your WordPress site and increase hosting costs. That's where Google Cloud Storage comes in, a reliable way to store and deliver your images, videos, and other files without overloading your server. By offloading media to Google Cloud, you can improve your website's speed, stability, and scalability.
In this guide, we'll explore the benefits of offloading media to Google Cloud, walk you through the setup process, and show you how to integrate it with WordPress plugins. You'll also find practical tips to reduce hosting costs and speed up your site's loading for optimal performance.
- Offloading media from WordPress to Google Cloud Storage frees up valuable server storage, enabling faster site performance and reducing hosting costs.
- By serving images, videos, and files from Google's global cloud infrastructure, your WordPress website experiences improved load times and enhanced user experience, boosting SEO rankings through better Core Web Vitals.
- Integration plugins like WP Offload Media offer automated synchronization and CDN compatibility, simplifying media management while providing scalability and reliability for growing websites.
Table of content
Benefits of Offloading Media to Google Cloud
Offloading your WordPress media to Google Cloud Storage helps make your website faster, more reliable, and easier to manage. Here are the key benefits you'll experience:
- Improved website performance - Media files are served directly from Google's fast global network, reducing load times and improving the overall browsing experience for your visitors.
- Reduced server load - By storing media externally, your hosting server handles less data, allowing it to run your site smoothly without lag or crashes.
- Better scalability - As your site grows, Google Cloud can easily handle thousands of new files without affecting performance, making it ideal for high-traffic or media-heavy websites.
- Enhanced reliability and security - Google Cloud provides built-in redundancy and robust security, ensuring your files are always available and protected against data loss.
- Cost efficiency - You can save money on hosting plans by reducing bandwidth and storage usage, paying only for what you actually use on Google Cloud.
Step-by-Step Setup Offload Your Media
Before you start offloading, make sure you have an active Google Cloud account and a WordPress site ready. The process is simple, you just need to connect both using a plugin that supports cloud storage integration. Below are three of the most common methods you can use, depending on your needs and preferred level of control.
Offload Your Media with WP Media Folder

WP Media Folder is a premium plugin that helps you organize your WordPress media library while connecting it to external cloud services like Google Drive. Before integrating it with WordPress, you'll need to set up your Google Cloud project.
Creating a Google Cloud Project
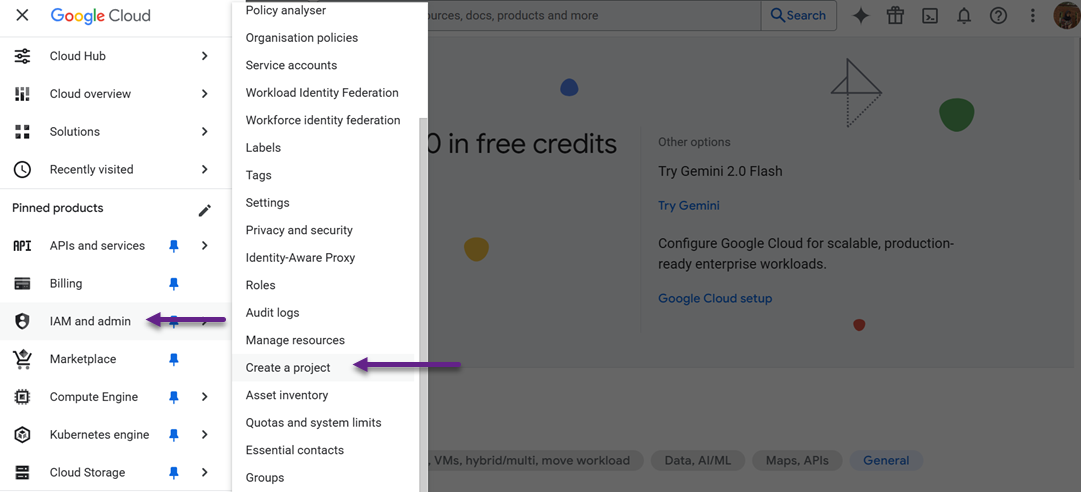
To begin using WP Media Folder with Google Cloud, you first need to create a project in Google Cloud Console. Start by logging into your Google account at console.cloud.google.com, then open the menu and navigate to IAM & Admin > Create a Project. Enter a project name. You can choose any name you like, but avoid using spaces or special characters. Once you click Create, wait a few moments for the project to be set up.
Next, you need to enable the necessary APIs for your project. Go to APIs & Services > Library, and enable both Cloud Storage API and Google Cloud Storage JSON API.
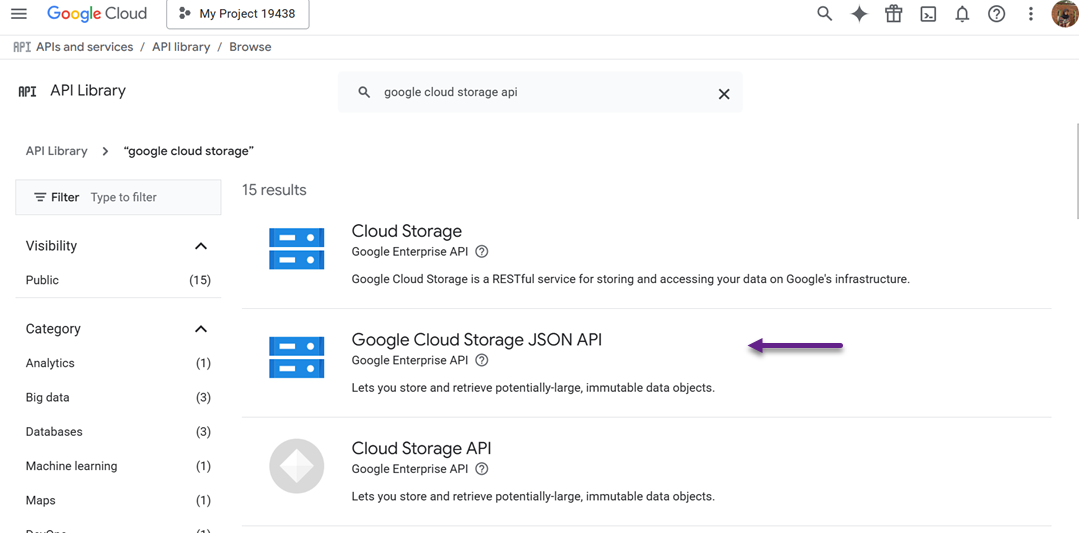
These APIs allow your WordPress site to communicate with your Google Cloud account and store media efficiently. Once this is complete, your project is ready for the next step, configuring credentials to establish a secure connection.
Configuring Credentials
After setting up your project, the next step is to configure your OAuth credentials so WP Media Folder can safely connect to Google Cloud. From the left sidebar, go to APIs & Services > Credentials, then click + Create Credentials > OAuth client ID.
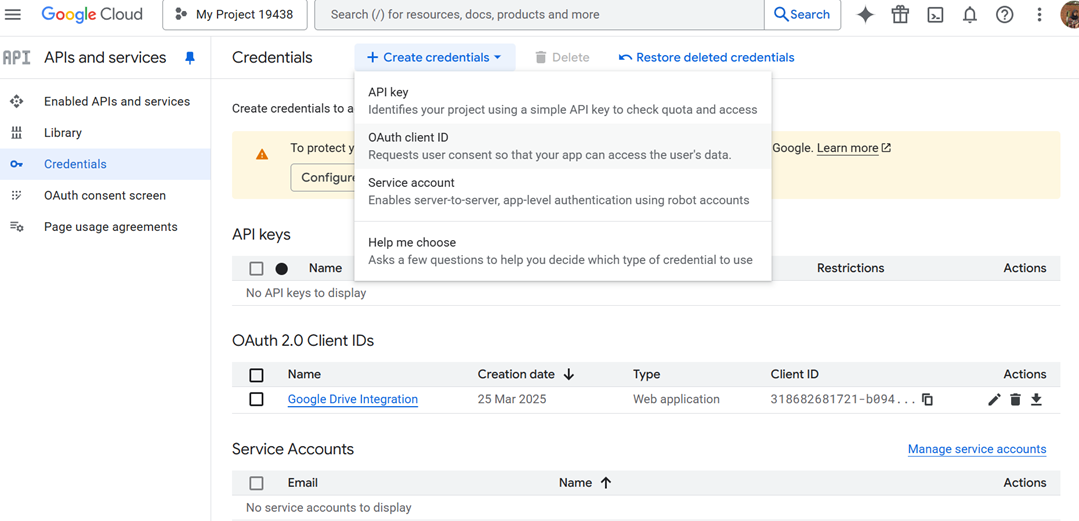
If prompted, you'll first need to set up your OAuth consent screen by providing your app name, email, and authorized domains (for example, your WordPress site domain).
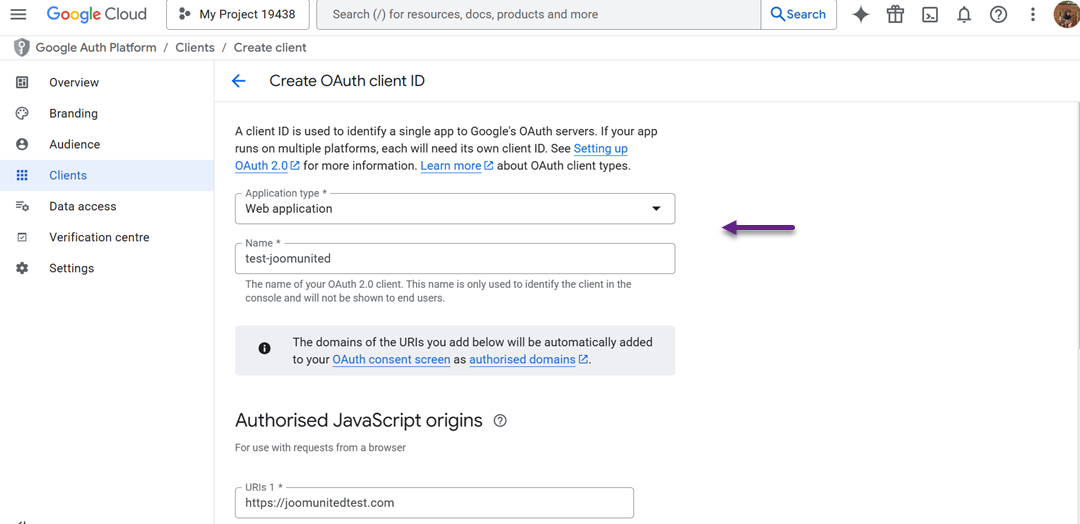
When creating the OAuth client ID, choose Web application as the application type.
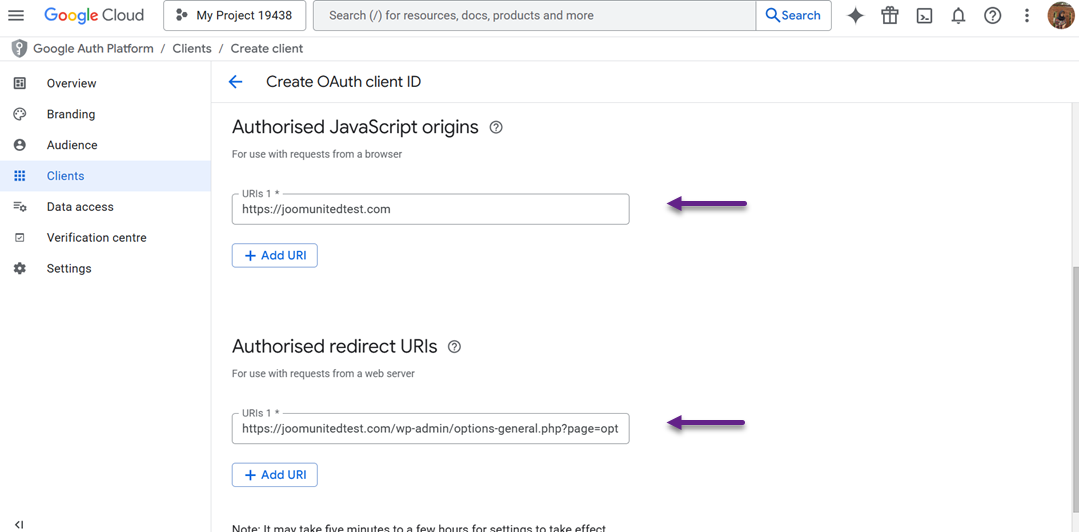
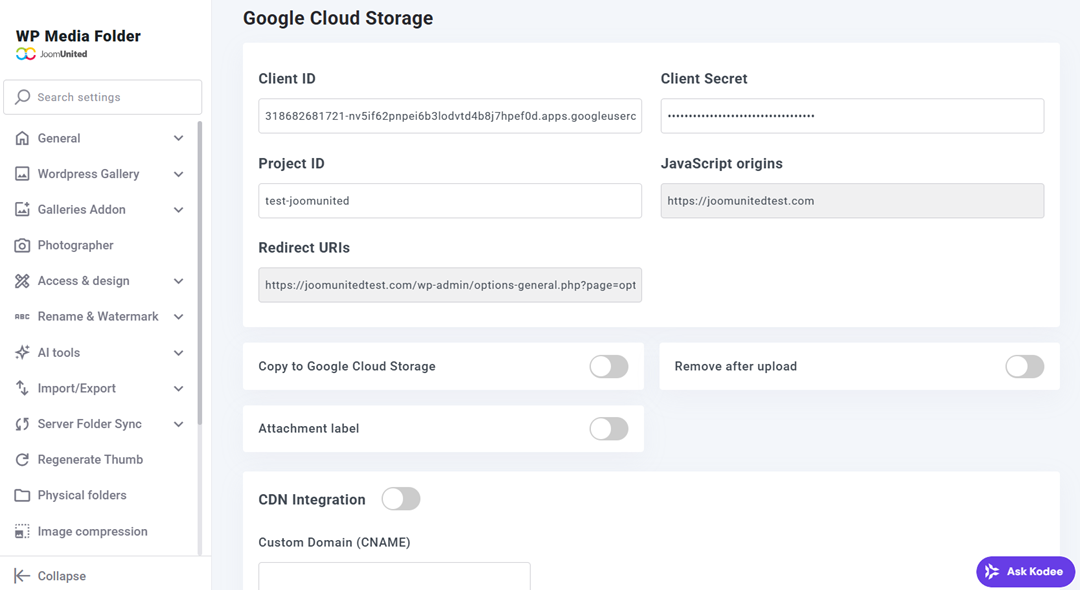
Add your website URL under Authorized JavaScript origins and your redirect URL under Authorized redirect URIs. Once completed, Google will generate a Client ID and Client Secret.
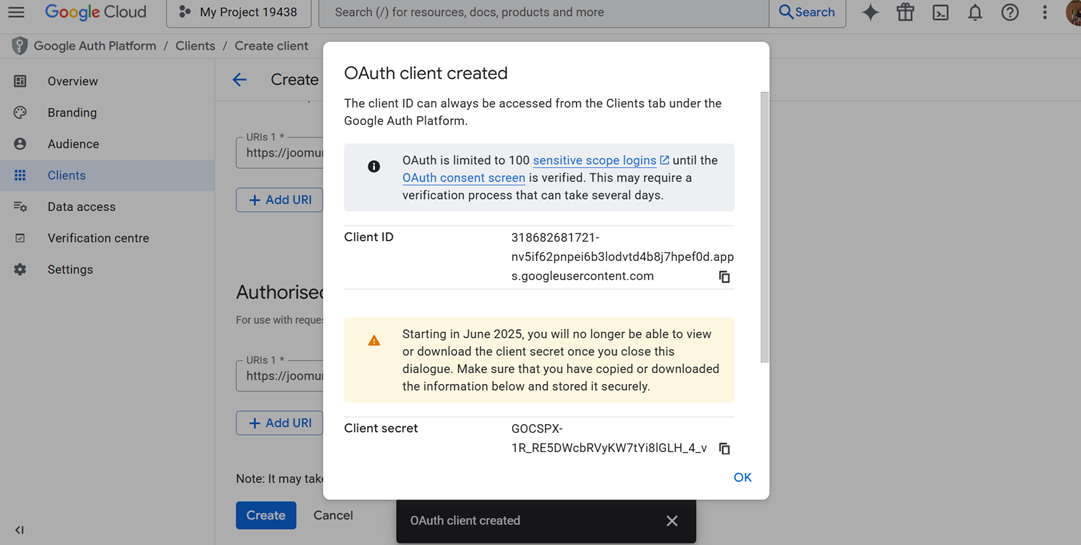
Keep these safe, you'll need to paste them into the WP Media Folder settings later. This credential setup ensures a secure, verified connection between your WordPress site and Google Cloud.
Integrating with WordPress
Now that your project and credentials are ready, it's time to connect Google Cloud with WP Media Folder. In your WordPress dashboard, go to Settings > WP Media Folder > Cloud > Offload Media, then click the edit icon under Select Cloud Provider and choose Google Cloud Storage.
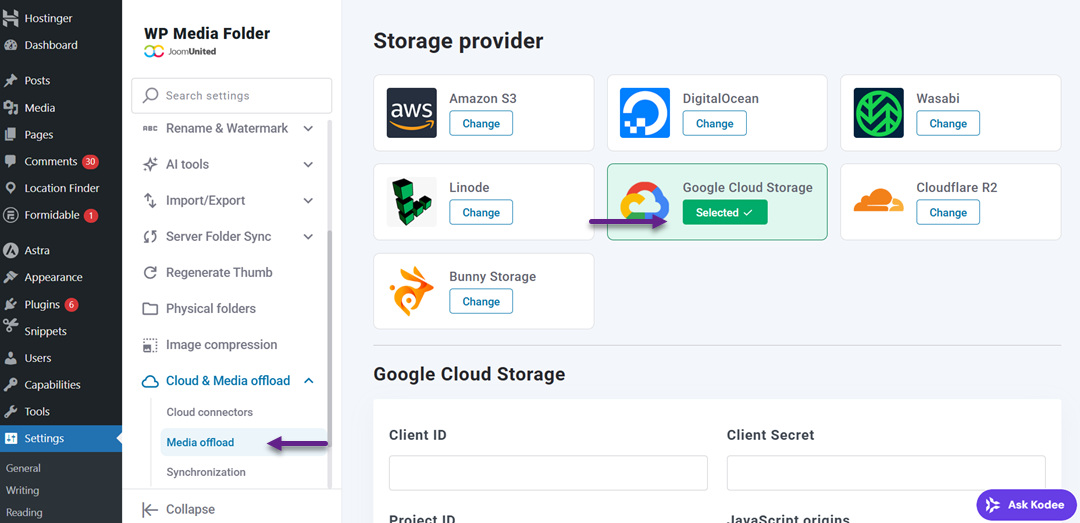
You'll be asked to fill in your Access Key ID, Secret Access Key, and Project ID. These come from the credentials you generated earlier in Google Cloud Console. After saving your settings, the plugin will automatically verify the connection.
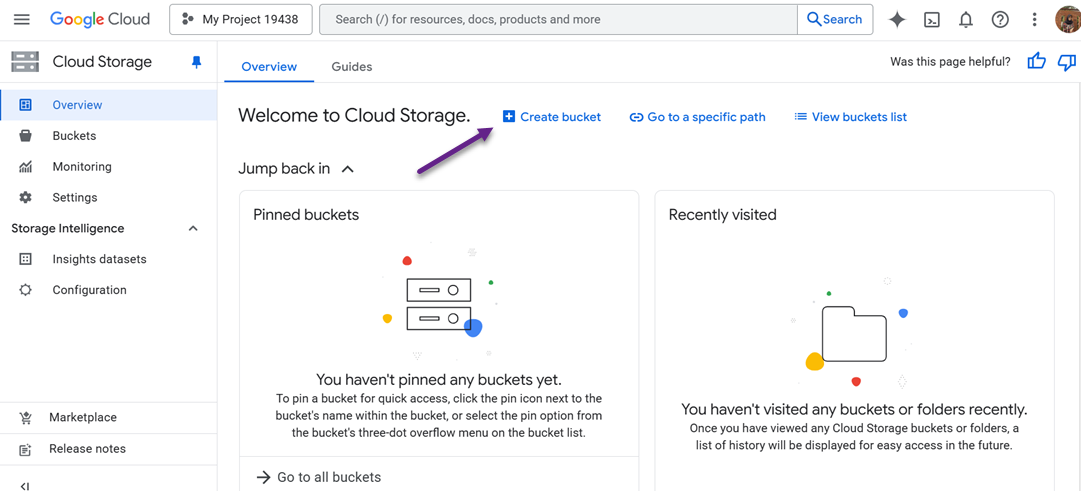
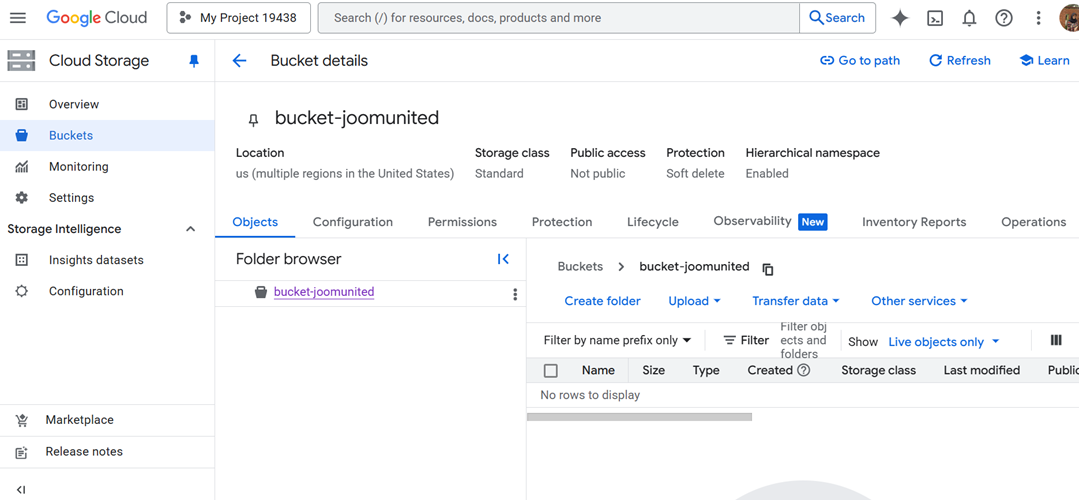
Then, once connected, you can create a bucket. Buckets can be created directly on the WP Media Folder page or at the link https://console.cloud.google.com/storage/overview. After that, select Create Bucket.
After that, fill in several fields as follows.
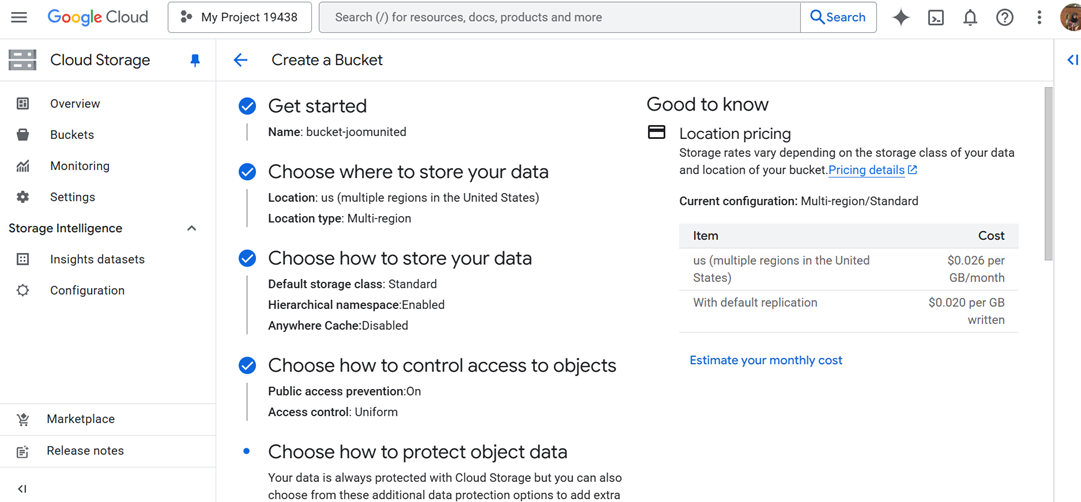
ated - If so, the bucket will be successfully created as follows.
To start transferring files automatically, you can enable the Copy to Google Cloud Storage option. With this setting activated, every new file you upload to your WordPress media library will be instantly copied to your Google Cloud bucket. If you already have existing media before enabling the integration, simply click the Synchronize with Google Cloud Storage button.
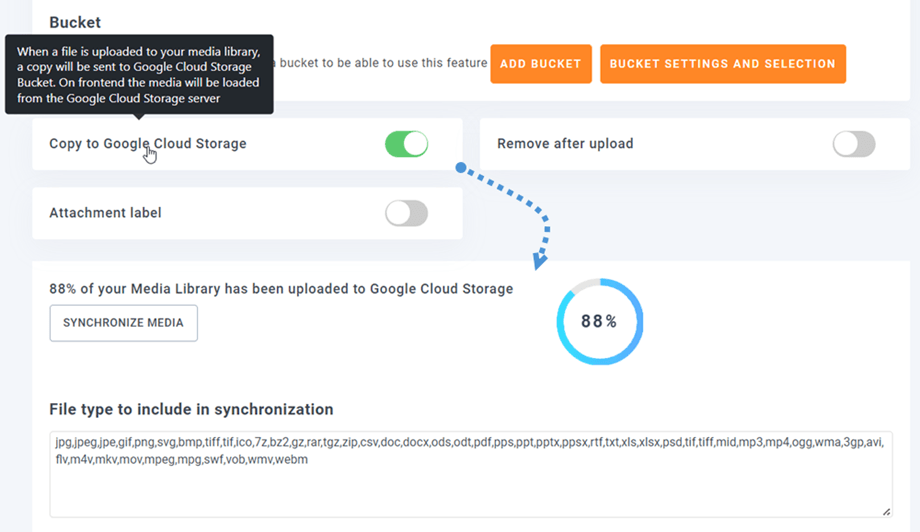
If you want to offload your files and free up server space fully, enable the Remove after upload feature. This ensures that all media is stored exclusively on Google Cloud rather than your hosting server. You can also turn on the Attachment label option, which displays file information whenever you hover over the Google Cloud icon in your media library, making it easier to identify offloaded files.
In case you ever need to move your files back or uninstall the plugin, use the Retrieve Google Cloud Storage Media option. This feature copies all your media from Google Cloud back into your WordPress library without breaking any existing links, ensuring your site continues to run smoothly.
For more information about integrating WordPress with Google Cloud, please refer to the article WP Media Folder Addon Google Cloud Storage Integration.
Say goodbye to messy media library.
WP Media Folder lets you categorize files, sync folders with
cloud storage, create amazing galleries and even
replace images without breaking links.
Optimize your media workflow today
Offload Your Media with WP Stateless
WP Stateless is a free plugin that automatically syncs your WordPress media files with Google Cloud Storage. It offers several modes, such as Stateless, which serves files directly from the cloud, and Backup, which keeps a copy on both your site and the cloud.
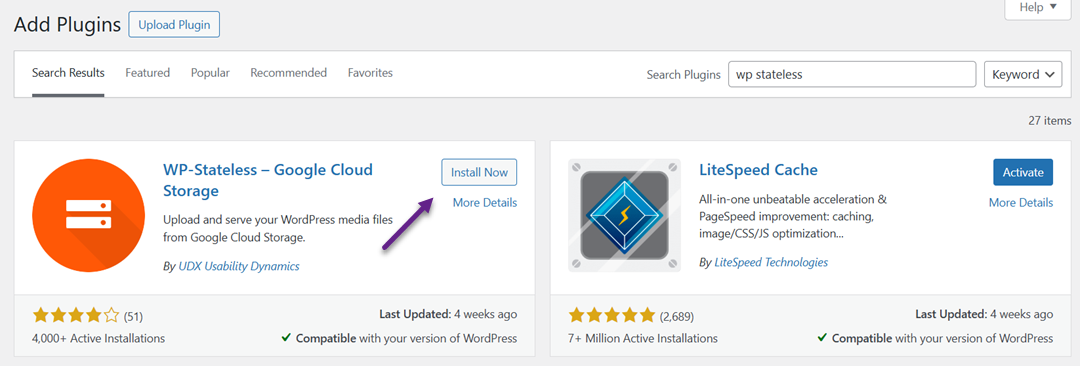
To begin, install and activate WP Stateless from Plugins > Add New in your WordPress dashboard.
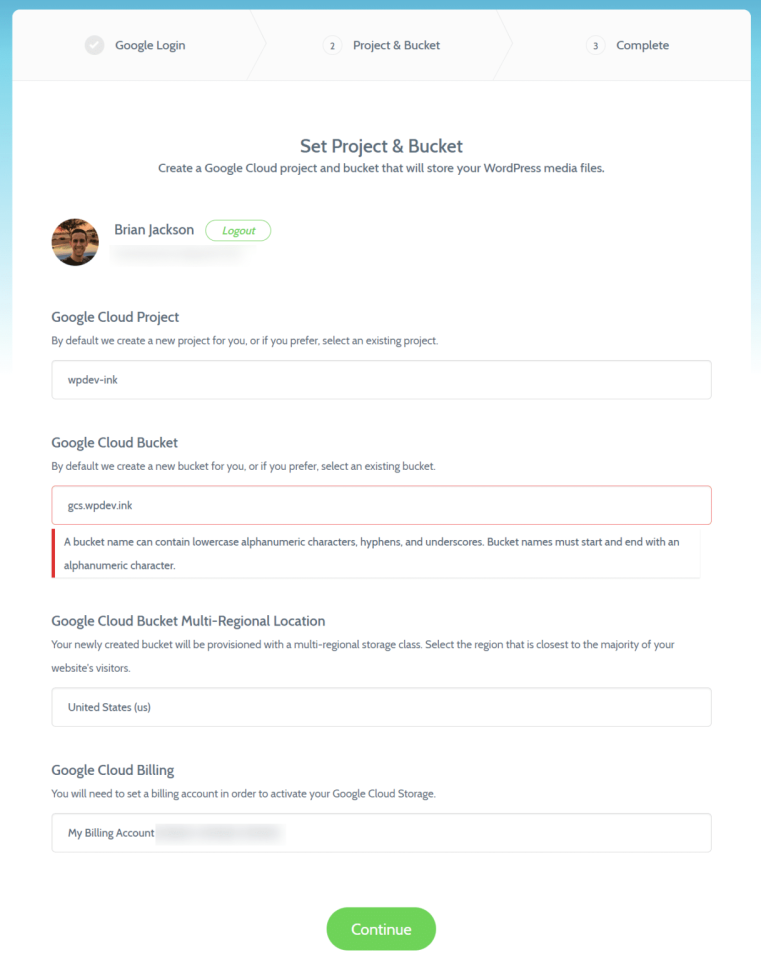
Once activated, launch the Setup Assistant and log in with your Google account. Allow access so the plugin can manage your Google Cloud projects.

You can create a new project or use an existing one, then choose or create a bucket to hold your media. During setup, make sure your bucket name matches your custom domain (e.g., gcs.yourdomain.com) to ensure smooth integration. Once everything is configured, click Continue, and you'll see a confirmation that your connection is complete.
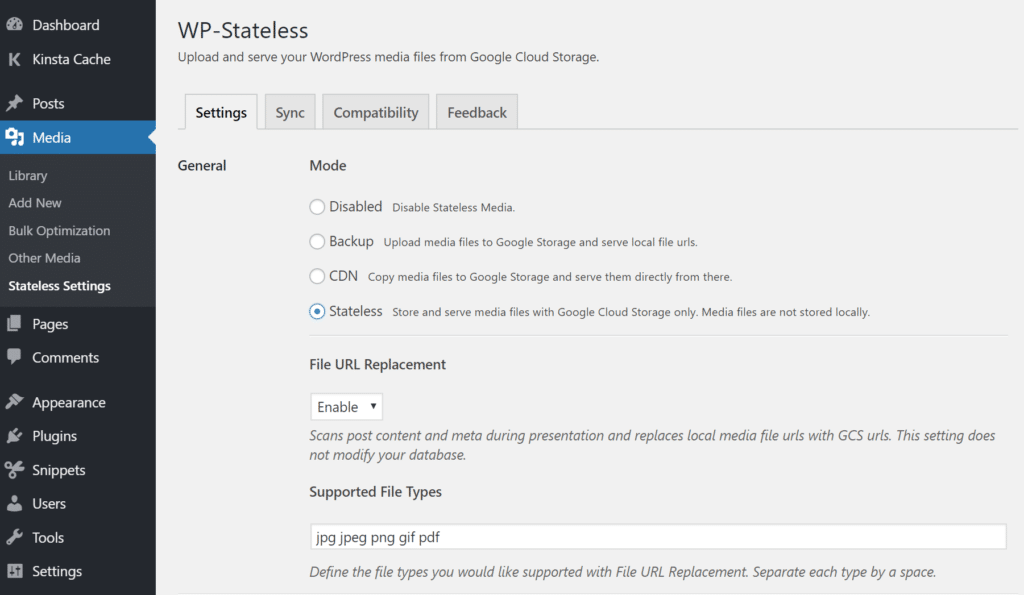
Inside your WordPress dashboard, go to Media > Stateless Settings to choose how media files are handled:
- Disabled: Turns off WP Stateless.
- Backup: Uploads files to Google Cloud but serves them from local URLs.
- CDN: Copies and serves media directly from Google Cloud (cannot be combined with other CDNs).
- Stateless: Fully offloads media to Google Cloud, removing local copies to save disk space.
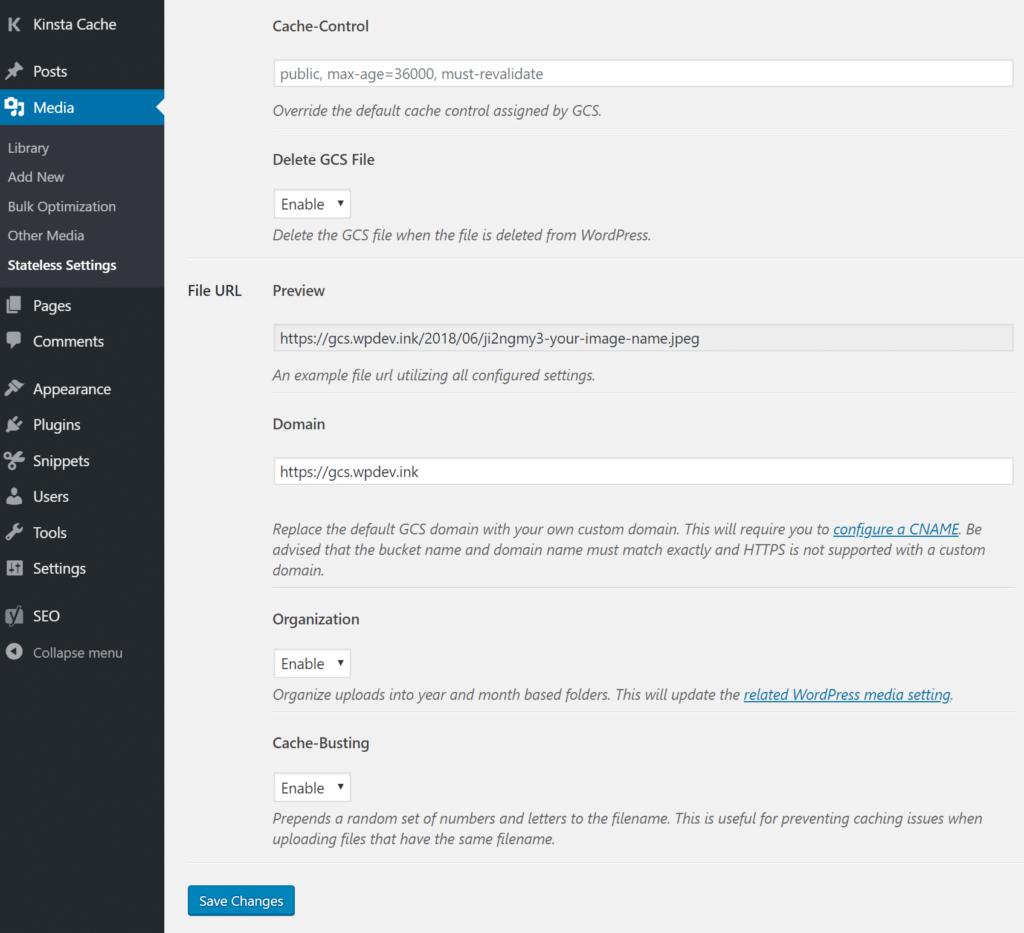
You can also enable additional settings, such as Cache-Control for faster delivery, Delete GSC File to remove files from Google Cloud when deleted in WordPress, and Cache Busting to prevent old cached files from loading.
Offload Your Media with WP Offload Media
WP Offload Media is a free and reliable plugin that automatically transfers your WordPress media files, such as images, videos, and documents, to a connected cloud storage provider. It supports major platforms like Google Cloud Storage, Amazon S3, and DigitalOcean Spaces.
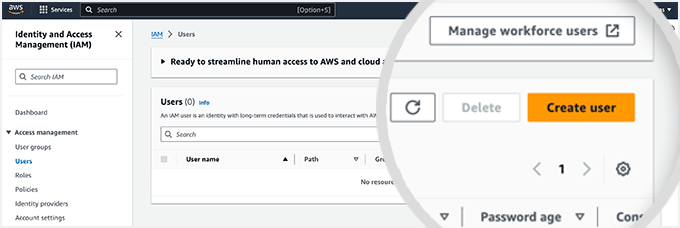
To get started, first set up your cloud storage account by creating a new project and user credentials. You can create a free AWS account on the official website (credit card required for verification) or sign in if you already have one.
Then, go to the Users page, click Create user, name it clearly (e.g., yourdomain-offloadwordpressmedia), skip console access, and attach the AmazonS3FullAccess policy. Click Create user to finish.
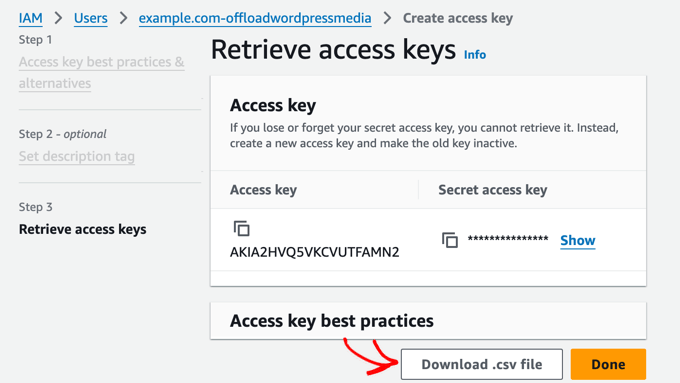
Next, open the user, go to Security credentials > Access keys, and click Create access key.
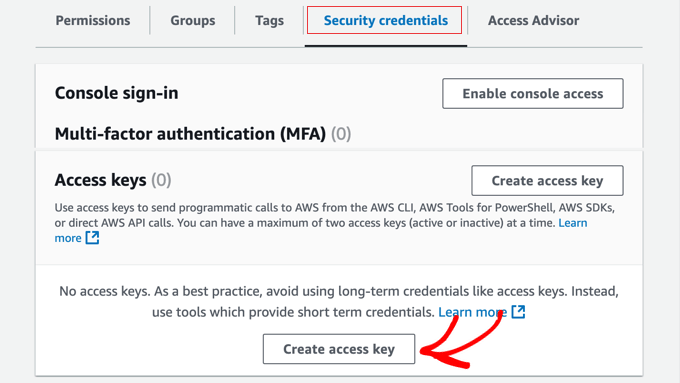
Choose Application running outside AWS, then download the .csv file containing your Access Key ID and Secret Access Key, keep it safe.
To connect with WP Offload Media, open your WordPress wp-config.php file and add this code:
define( 'AS3CF_SETTINGS', serialize( array(
    'provider' => 'aws',
    'access-key-id' => 'YOUR_ACCESS_KEY_ID',
    'secret-access-key' => 'YOUR_SECRET_ACCESS_KEY',
) ) );
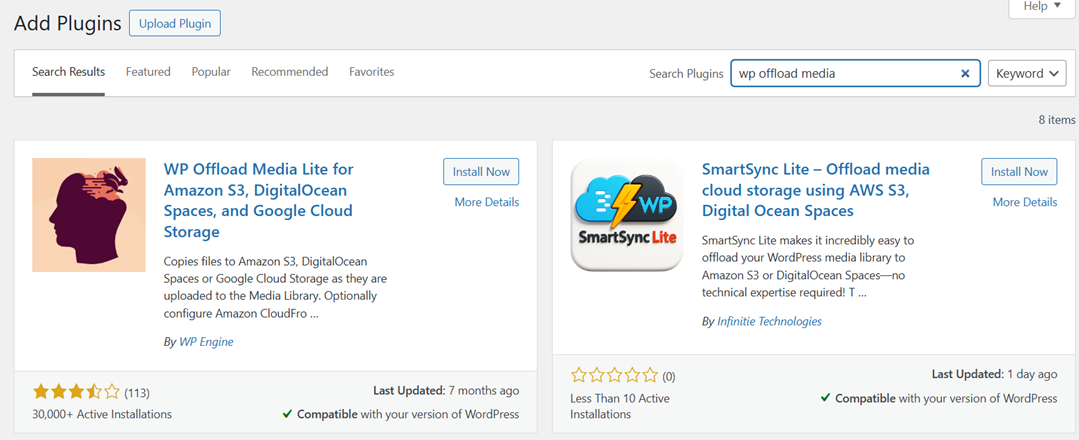
Then, install and activate the WP Offload Media plugin from your WordPress dashboard.
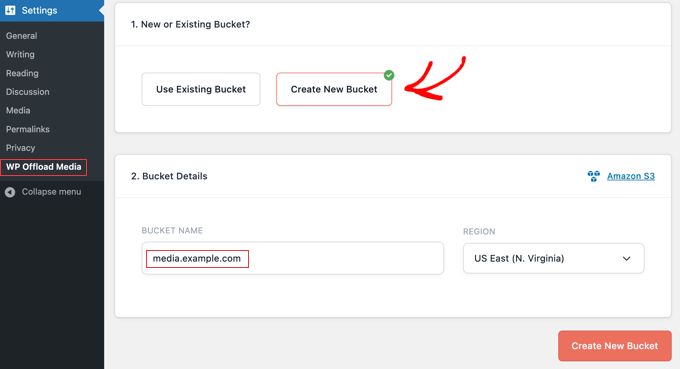
Once activated, go to Settings > WP Offload Media and connect your WordPress site by entering the access keys provided by your cloud storage service. Next, create a new bucket, a dedicated folder in the cloud that stores your media files. Give your bucket a clear name (for example, media.yourdomain.com) and choose the nearest region to your main audience to ensure faster delivery.
After saving the configuration, any new media you upload to WordPress will automatically be stored and served from your chosen cloud provider. This setup helps reduce hosting load, improve site speed, and ensure smoother media delivery across the web.
Tips for Reducing Hosting Costs and Improving Load Speed
Offloading your media to Google Cloud can significantly improve your website's performance, but combining it with a few optimization strategies can make an even bigger impact. By managing how your media is stored, delivered, and maintained, you can not only boost loading speed but also reduce unnecessary hosting expenses. Here are some practical tips to help you get the most out of your setup.
Optimize Delivery with Caching and CDN
Caching and CDN (Content Delivery Network) integration ensure that your media files load quickly for visitors around the world. A CDN stores copies of your media across multiple global servers, allowing users to download files from the server closest to them. This reduces latency and improves loading times dramatically, especially for image-heavy or high-traffic websites.
Additionally, enabling caching on both your website and server ensures that frequently accessed files don't need to be reloaded each time. Plugins like WP Speed of Light can help automate this process. When used together with Google Cloud, these tools create a powerful combination that optimizes media delivery and enhances the user experience.
Remove Unused or Duplicate Media
Over time, WordPress sites accumulate unused or duplicate media files that consume valuable storage space. These files not only increase hosting costs but can also slow down your media management process. Regularly auditing your media library helps you maintain a clean, efficient setup.
You can use tools like Media Cleaner to safely detect and remove files that are no longer in use. Before deletion, make sure to back up your data to avoid losing important assets. Keeping your storage organized not only saves money but also simplifies future backups and migrations.
Compress Images Before Upload
Large, unoptimized images are one of the biggest culprits behind slow-loading websites. Compressing images before uploading helps you maintain visual quality while reducing file sizes, which leads to faster page loads and lower bandwidth usage.
Tools like TinyPNG, ShortPixel, or Imagify can automatically compress your images without noticeable quality loss. If you prefer an automated workflow, you can integrate these tools directly with WordPress. By optimizing your images early in the process, you ensure that your website remains lightweight and efficient from the start.
Monitor Your Google Cloud Storage
Regularly monitoring your Google Cloud storage usage ensures that you're not overpaying for unused capacity. Keeping an eye on how much data your website generates and stores allows you to identify trends and make necessary adjustments before they become costly.
Google Cloud provides detailed storage reports that show which files consume the most space and how often they're accessed. Based on these insights, you can decide whether to archive, delete, or move files to cheaper storage options like Google Cloud Nearline or Coldline. Proactive monitoring helps maintain performance while keeping your cloud costs under control.
Calling all webmasters!
Save time and boost productivity with WP Media Folder. Effortlessly organize client media
files, create custom
galleries, and provide a seamless user experience.
Upgrade your website projects now!
Conclusion
Offloading media to Google Cloud Storage is a powerful way to improve your WordPress site's performance, reliability, and scalability. By transferring images, videos, and other files to the cloud, you reduce your hosting server's workload and ensure faster content delivery through Google's global network. Using plugins like WP Media Folder, WP Stateless, or WP Offload Media, you can automate this process and keep your media library organized without sacrificing speed or quality.
Whether you manage a personal blog or a high-traffic business site, offloading media helps cut hosting costs and enhance the user experience. To make the process even easier and more efficient, try integrating your WordPress site with WP Media Folder for seamless Google Cloud synchronization.
When you subscribe to the blog, we will send you an e-mail when there are new updates on the site so you wouldn't miss them.

Comments