How to Use FTP to Upload Files to WordPress for Beginners

Sometimes, you may need to access your WordPress files directly to upload a theme, install a plugin, or fix an error. One of the simplest ways to do this is by using FTP (File Transfer Protocol). Learning how to use FTP to upload files to WordPress can save you a lot of time, especially when you can't make changes through the WordPress dashboard.
- FTP provides a reliable way to manage your WordPress files—allowing you to upload, edit, or delete files directly on your site even if you're locked out of the WordPress dashboard or run into admin issues.
- For beginners, FTP empowers you with more control and flexibility, making it simple to upload themes, plugins, bulk media files, or troubleshoot site problems with easy drag-and-drop or right-click uploads.
- Uploading files via FTP is faster for large or multiple uploads and lets you place files exactly where they belong in your WordPress directory, ensuring stable site updates and safe customizations.
Table of content
In this guide, you'll learn everything you need to know to get started with FTP, from choosing an FTP client to connecting and transferring files safely.
What is FTP?

FTP (File Transfer Protocol) is a protocol for transferring files between your computer and the server hosting your WordPress site. Think of it as a bridge that connects your device to your website's storage. With FTP, you can upload, download, or edit files on your site without needing to log in to the WordPress dashboard.
FTP is usually used via an FTP client, such as FileZilla. In this app, you'll see your WordPress site folders on the right (server) and your local folders on the left (computer). With a simple drag and drop, you can move files from your computer to your WordPress server easily.
Why You Need to Upload Files to WordPress Using FTP?
Sometimes, you can't upload files directly through WordPress because the file size is too large, there's an error in the dashboard, or you need to fix a broken file. In these cases, FTP is a quick and practical way to manage your files directly on the server.
Here are a few common reasons why you might need to use FTP with WordPress:
- Upload themes or plugins manually: when installation through the dashboard fails.
- Fix website errors: for example, when a theme or plugin causes your site to crash.
- Back up important files: such as the wp-content folder or the wp-config.php file.
- Edit or replace files directly from the server: without needing cPanel access.
With FTP, you gain full control over your WordPress site's files. While it might sound technical at first, the process is actually quite simple once you understand the basic steps.
Choosing an FTP Client

Before you can start transferring files, you'll need an FTP client, a program that connects your computer to your WordPress hosting server. It allows you to upload, download, and manage files using the FTP protocol. There are several FTP clients available, each with its own features and compatibility depending on your operating system.
Here are some popular and reliable FTP clients you can choose from:
- FileZilla: One of the most popular FTP clients for both Windows and Mac. It's free, open source, and easy to use, perfect for beginners. FileZilla also supports the Secure File Transfer Protocol (SFTP), making it a safe option for transferring website files.
- WinSCP: A great choice for Windows users who want a clean interface and advanced file management features. WinSCP is known for its strong security options and the ability to save connection profiles for easier access.
- Cyberduck: Ideal for Mac users, Cyberduck is a simple yet powerful FTP client that also supports cloud storage services like Google Drive and Dropbox. Its drag-and-drop functionality makes file transfers effortless.
All these clients work similarly, you'll connect to your website using your FTP credentials and then transfer files between your computer and the server. In this guide, we'll use FileZilla as an example, but you can follow the same steps with any FTP client you prefer.
Alternatively, if you'd rather manage your WordPress files without switching between external apps, you can use a plugin like WP File Download. It provides an intuitive interface directly inside your WordPress dashboard, letting you upload, organize, and control file access without leaving your site.
With WP File Download, you can enjoy the same flexibility as using an FTP client, but in a simpler, faster, and more visual way.
Looking for a powerful file management solution for client websites?
WP File Download is the answer. With advanced features like file categories, access
restrictions, and intuitive UI.
Impress your clients with top-notch file organization!
Connecting to WordPress via FTP

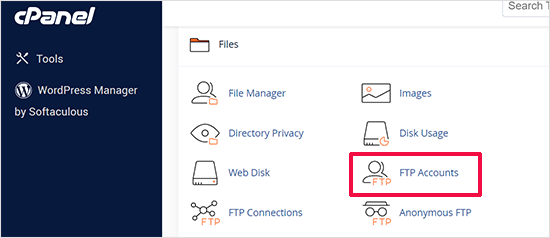
To connect your WordPress site using FTP, you'll need your FTP login credentials, which include a username, password, and host address. Your web hosting service usually provides these details, you can find them in your hosting dashboard (like cPanel) or in the welcome email you received when you created your hosting account.
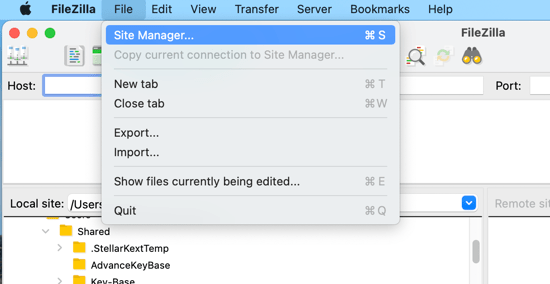
Once you have your credentials, open your FTP client (for example, FileZilla). From the top menu, click File > Site Manager to set up a new connection.
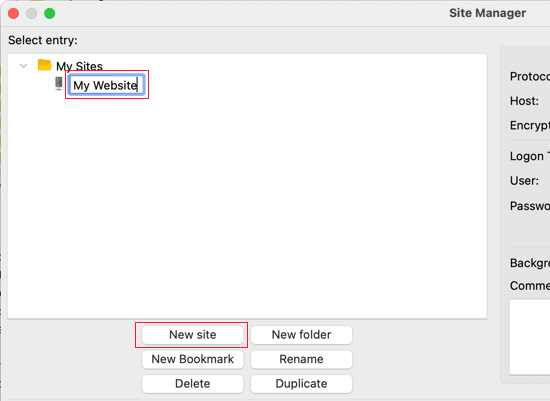
Then, select New Site and give it a name, this helps you identify your site easily later.
Next, enter your connection details:
- Host: usually your domain name (e.g., yourdomain.com) or sometimes ftp.yourdomain.com
- Protocol: choose SFTP if your host supports it, otherwise select FTP
- Logon Type: choose Normal
- Username and Password: use the credentials provided by your host
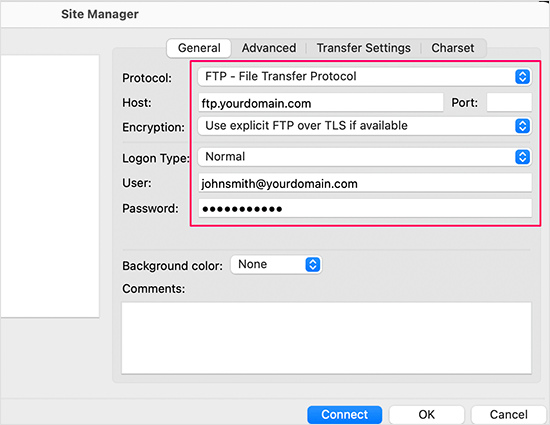
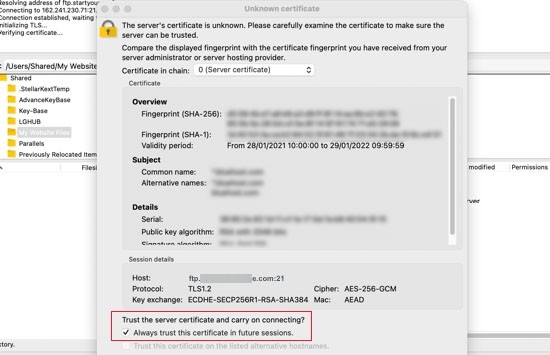
After filling in the information, click Connect. If this is your first time connecting, FileZilla may show a security certificate pop-up, check the box that says "Always trust certificate for future sessions" and press OK to proceed.
Once connected, you'll see two panels:
- Left side (Local site) – files and folders on your computer
- Right side (Remote site) – files stored on your WordPress hosting server
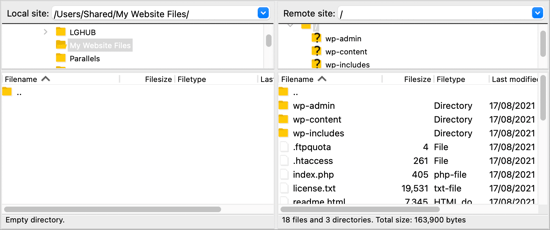
This layout allows you to easily drag and drop files between your computer and your WordPress site, making file management quick and convenient.
Uploading Files to WordPress via FTP
Once your FTP connection is set up, you can start transferring files to your WordPress site. Let's begin with a simple example, uploading a small test file to make sure everything works correctly.
On your computer, open Notepad (Windows) or TextEdit (Mac), create a blank document, and save it as test-upload.txt. Then open your FTP client and locate the folder containing this file in the Local Site panel on the left.
Next, go to the Remote Site panel on the right and navigate to the main directory of your WordPress site. Right-click the test file and select Upload.
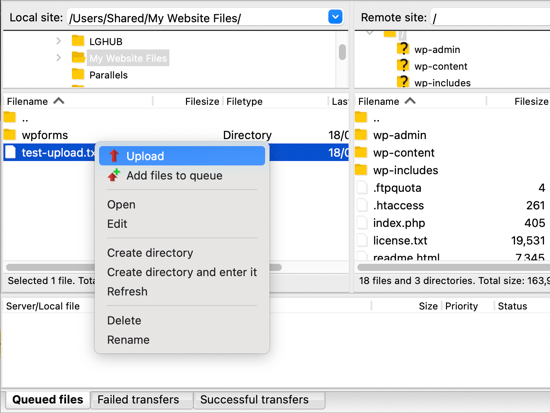
The file will be copied from your computer to your website, while the original is safely stored on your device.
It's best to use the right-click upload method rather than dragging and dropping files. Drag-and-drop uploads can sometimes lead to mistakes, such as accidentally placing a file in the wrong folder. Since WordPress stores specific files in specific locations, uploading to the wrong place might cause your site to malfunction.
Here's a quick guide to where different types of files should go:
- Media files: /wp-content/uploads/
- Themes: /wp-content/themes/
- Plugins: /wp-content/plugins/
For example, if you want to install a plugin manually, first download it from WordPress.org, then unzip the file. You'll get a folder containing all the plugin files. In your FTP client, open that folder on the left panel, then navigate to /wp-content/plugins/ on the right panel and upload it.

The upload process for plugins or themes may take longer than a single file. Once it's done, open your WordPress admin dashboard, go to the Plugins or Themes page, and activate your newly uploaded item.
Downloading or Backing Up Files via FTP

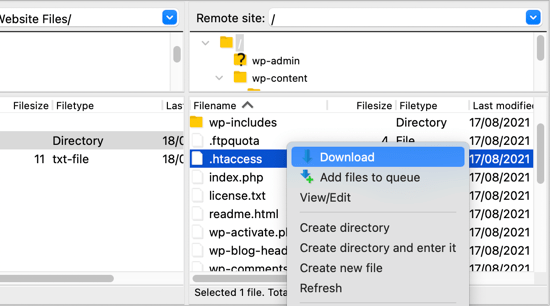
FTP isn't just for uploading files, you can also use it to download files from your WordPress site to your computer. This is useful when you need to edit a file locally or create a backup copy of your site's files.
To download a file, open your FTP client and navigate to the file you want in the Remote Site panel (right side). Then, right-click the file and choose Download. The file will automatically be copied to the folder you're currently viewing on your computer in the Local Site panel (left side).
You can also download all your WordPress folders and files to your computer as a simple backup. Just select everything in the root directory and start the download process. However, keep in mind that this method only backs up your WordPress files, it doesn't include your website's content, such as posts, pages, or comments, which are stored in your WordPress database.
To create a complete backup of your website, you'll need to back up both your files and your database. You can export the database manually from your hosting control panel or use a WordPress backup plugin for an easier, automated process.
Best Practices for Using FTP with WordPress

Using FTP gives you complete control over your WordPress files, but with great power comes responsibility. To keep your site secure and avoid accidental mistakes, it's important to follow a few best practices when managing files through FTP.
Use SFTP for Secure Transfers
Always choose SFTP (Secure File Transfer Protocol) instead of standard FTP. Unlike FTP, SFTP encrypts your connection, keeping your login details and files protected from hackers and data leaks.
Most hosting providers already support SFTP by default. When connecting via your FTP client, select the SFTP option to ensure all file transfers are encrypted and secure.
Backup Before Making Changes
Before you upload, replace, or delete any files, create a full backup of your WordPress site, including both the files and the database. This gives you a safety net if something goes wrong during the transfer.
You can back up manually by downloading your wp-content folder via FTP or use a plugin for automated backups. Having a recent backup ensures you can restore your site quickly without losing important data.
Limit and Protect Access
Only give FTP access to trusted users, and revoke it once it's no longer needed. Also, make sure to use strong, unique passwords and change them regularly to reduce the risk of unauthorized access.
Create separate FTP accounts for each user rather than sharing a single account. This makes it easier to manage permissions and maintain better security.
Keep Software and Permissions Updated
Make sure your FTP client is always up to date, as updates often fix bugs and security vulnerabilities. Outdated software can leave your site open to attacks.
In addition, check your file permissions to ensure only authorized users can modify important files. Setting proper permissions helps prevent accidental deletions or unwanted changes.
Calling all webmasters!
Enhance your client websites with WP File Download. Create secure and customizable file
repositories, allowing clients
to easily access and manage their files.
Upgrade your web design services today!
Conclusion
Learning how to use FTP to upload files to WordPress gives you greater control over your website's structure and functionality. With FTP, you can manually add themes or plugins, fix errors, or back up files when the dashboard isn't accessible. While it may seem technical at first, mastering FTP is an essential skill for every WordPress user who wants flexibility and direct file management.
To make your file management even easier, consider using a dedicated plugin like WP File Download. It lets you organize, upload, and manage your WordPress files directly from the dashboard, no need to open an FTP client. This way, you can enjoy the same control and flexibility of FTP, but in a more visual and beginner-friendly interface.
When you subscribe to the blog, we will send you an e-mail when there are new updates on the site so you wouldn't miss them.

Comments